Pages

Showing posts with label Chocolate. Show all posts

Monday, January 26, 2015

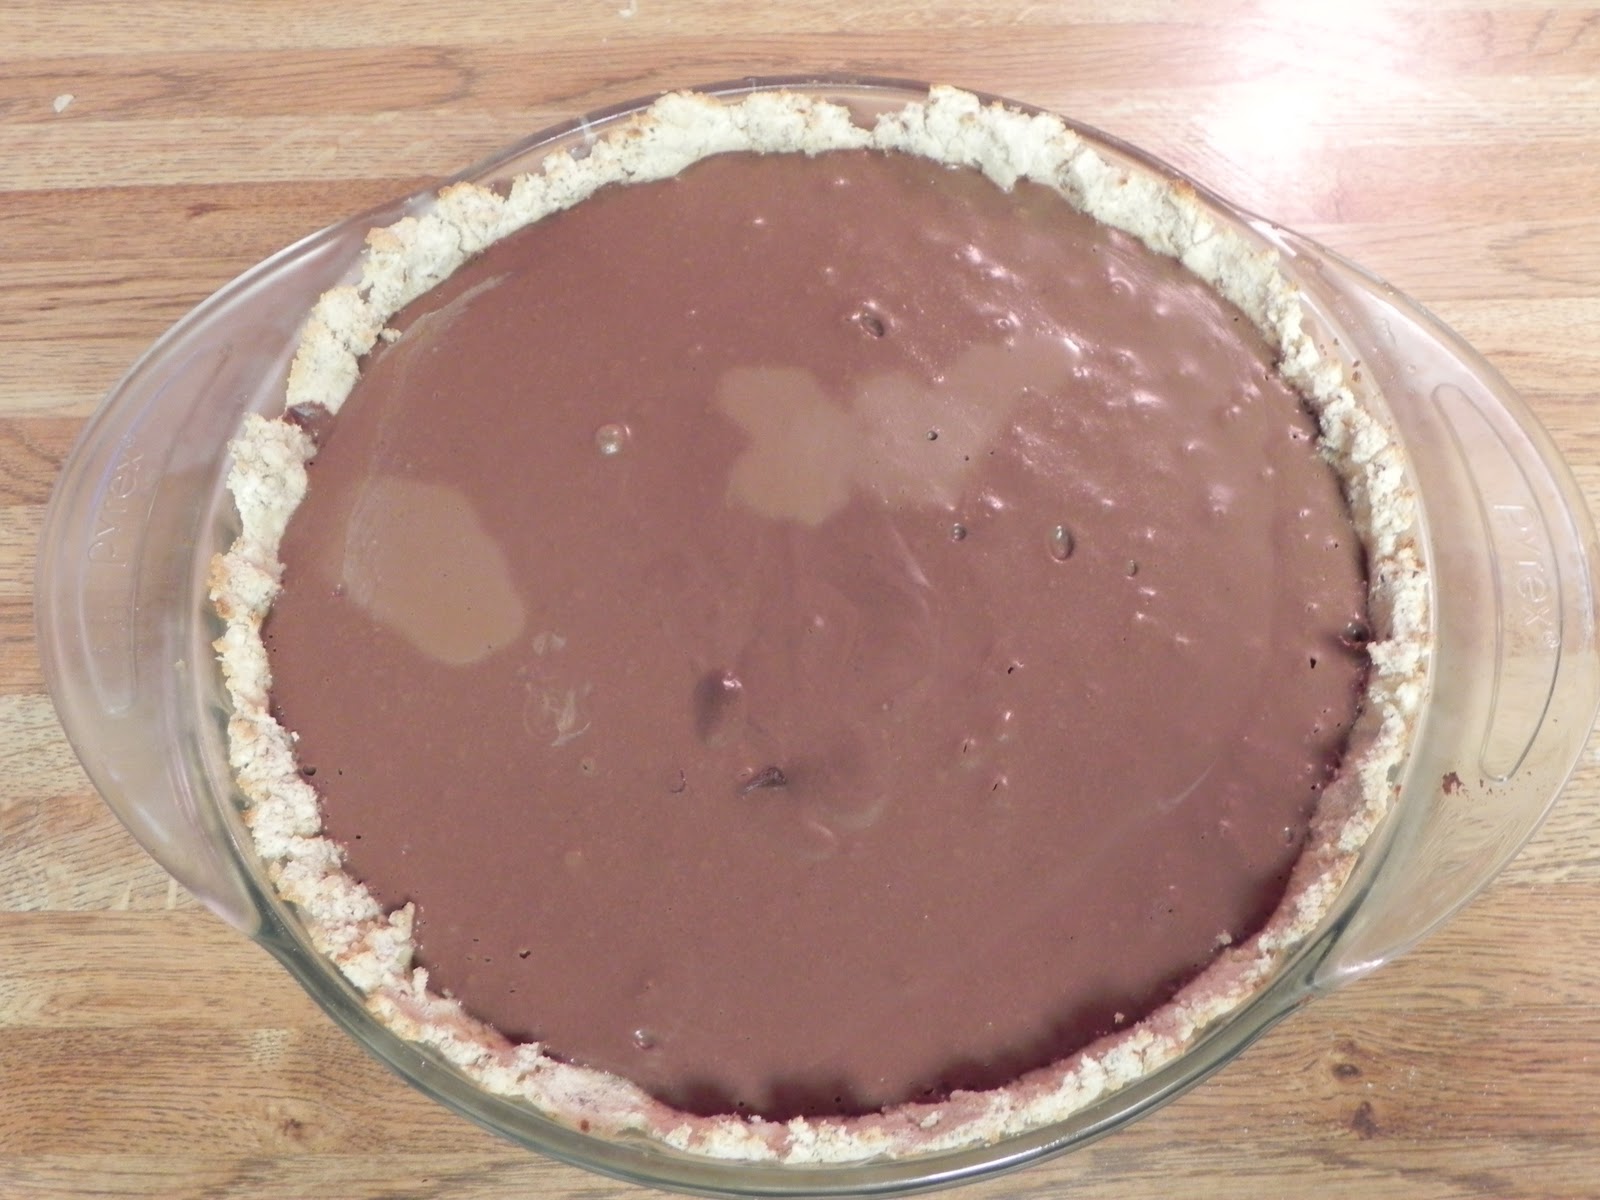
French Silk Pie

A few days ago, More than a year ago, I posted about really wanting to make a  vegan French Silk Pie. I based mine on this recipe, and it was a bit of a rough (though delicious) experience. The recipe I used for inspiration suggested you could use silken or firm tofu -- which maybe is true if you have a fancy VitaMix blender (which I now have access to). I actually use a pretty strong blender and it was upset by the tofu I used (labeled as "soft" though where I live, the "soft" tofu is just as firm as extra firm a lot of times). Therefore, I had to add more liquid than what I'm going to list here to make it so the blender could blend the tofu until very smooth. I used a combination of water and soymilk. If you find yourself in a similar situation, add liquid about 2 tablespoons at a time until your blender can work with the tofu (and later, the tofu and chocolate mixture). You don't want it soupy -- it should be about the consistency of well-mixed natural peanut butter when you're done.
This picture was taken on my phone, and
unfortunately I messed up putting on the raspberries!

The fun part about this recipe is that you can eat a pudding-like version of it pretty much right away, or you can let it sit in the refrigerator and firm up. I think the flavors are actually best if it's had about 24 hours to rest, so if you can make this in advance, please do.

French Silk Pie (vegan, gluten-free)
1 gf vegan pie crust, pressed into a pie pan or 8x11 baking dish

For filling:
12 oz mori-nu Silken Extra Firm or water-packed soft tofu
2 tablespoons cocoa powder (Do not omit, it REALLY makes the difference, so chocolatey.)
1 tsp pure vanilla extract
3 tablespoons not-milk of choice*
scant 1/8 tsp salt
8 oz dairy-free chocolate chips (I used about 1 cup)
2-3 tablespoons agave or other sweetener

*You may need more not-milk or water, depending on how soft (or firm) your tofu really is.

Blend the tofu in a food processor or blender until it is very smooth (you may need to add liquid at this point, depending on the consistency of your tofu). Set aside. Melt the chocolate on the stove top over low heat, until the chips are just melted (careful not to scorch). All all remaining ingredients to the blender, and blend until very smooth (again, depending on the consistency of your mixture you should add more liquid a little bit at a time), about the consistency of unrefrigerated, natural peanut butter.

For whipped topping:
1 can full fat coconut milk, refrigerated overnight
1 teaspoon vanilla
1/4 cup powdered sugar
Raspberries, optional


Remove the can from the fridge. Turn it upside down and open it. Spoon out the solids and place in a chilled bowl. Add the vanilla and powdered sugar (and cinnamon, if using) and using a hand or electric beater, beat until it begins to resemble whipped cream. Spread over the top of the pie and refrigerate the whole thing until ready to serve.

Monday, January 19, 2015

Product Review: Barney Butter Almond Butter Cocoa & Coconut

I bought Barney Butter Almond Butter Cocoa + Coconut recently, because it was on sale at a local grocery store. I also wanted to treat myself because I'd just accepted (and signed the papers for) a new job. Barney Butter comes in a variety of almond-y goodness, including vanilla bean + espresso, honey + flax, and raw + chia.

I selected the cocoa + coconut variety because, frankly, I wanted chocolate in my nut butter. I've been on a quest for a chocolate-y nut butter that could remind me of Nutella, but which wasn't, in fact, Nutella. The Barney Butter Almond Butter Cocoa + Coconut is the closest I've come, and while it's admittedly been years since I've eaten Nutella (for a number of reasons I won't go into here), I think
it's safe to say that I prefer the taste of the Cocoa + Coconut combination Barney Butter makes.

I like that it has a distinct chocolate flavor (from Enjoy Life Chocolate chips, which I've previously reviewed here), but that this doesn't overwhelm my mouth with omgchocolate the way some other chocolate nut butters do -- nor does it leave me wanting to eat more simply to avoid that icky after-taste of some cheaper chocolates (ugh)! It is distinctly coconut-y, which I don't mind, but I know some tasters probably don't care for, and at the room temperature of my house (pretty cool this winter), it's quite thick. It's also incredibly smooth.

This nut butter separates -- or at least my jar had -- despite what the website says. I stirring it a bit more difficult than with most natural (pea)nut butters, but worth it. Once I stirred it, there wasn't a problem with it separating again.

For me, this will stay a special occasion nut butter -- even the plain varieties are pretty expensive, but it's one I'd consider gifting to foodie friends or to people who don't want more things in their life. I imagine it's also a product I'd splurge on for myself once in a while.

Monday, December 31, 2012

Monster Cookes

How many times have I made Monster Cookies over the past 4 years (since I first learned about them)? More than I'd like to admit. There was a period where I was making them for every bring-something potluck or dinner I went to, and also a period of time where I was making them about once a week for a on-going bake sale fundraiser to support a literary journal (along with cake pops), where I was a member of the staff.

The thing I like about Monster Cookies are that they basically work with what you probably already have in your kitchen -- peanut butter, sugar, oats, butter (or in my case, vegan butter or coconut oil or even just canola oil), eggs (ehm, fake eggs), and chocolate, nuts/seeds, and dried fruit. Or, whatever else you want to throw in them.

I haven't made them since switching to a vegan diet, though I have made vegan monster cookies before. And I haven't tried to consciously make them just a little better for you, while still definitely tasting like an indulgence. To be sure, these are cookies, and they are an indulgence, just so we're all clear. But some indulgences are worse than others, right??

What makes these monster cookies better for you? Well... that's a somewhat subjective question, but these cookies are:
  • Gluten-free
  • Vegan
  • Low in refined sugar (they use agave nectar and the pictured cookies also use Enjoy Life (vegan, gf, soy free) semi-sweet chocolate chunks
  • High protein (especially if you add seeds/nuts!)
They're also moderately low fat (only a small amount of oil is needed to help these cookies become chewy and crispy and soft, the perfect combo in my mind) since most of the fat comes from peanut butter. They include whole grains, and they can use dried fruits or nuts of whatever sort makes you happiest.

Monster Cookies (vegan, gluten-free)
1 cup creamy peanut butter
1/2 cup agave nectar
1 tablespoon coconut oil, melted
2 flaxseed eggs (2 tablespoons ground flaxseed combined with 6 tablespoons water)
1/4 cup unsweetened apple sauce
2 1/2 cups gluten-free oats (quick oats works best, but I never have them on hand, so pictured you'll see old-fashioned oats)
1 teaspoon baking soda
1/4 teaspoon salt
1.5 cups of any combination of the following (or whatever your heart desires): VGF chocolate chunks/chips, sunflower seeds, pumpkin seeds, dried cranberries, raisins, chopped peanuts, VGF candy-coated chocolate (i.e. - sunspire drops), coconut flakes, slivered almonds, banana chips, etc.

Preheat oven to 350 degrees. In a medium-sized mixing bowl, combine the peanut butter, agave nectar, coconut oil, flax eggs, and apple sauce, and stir until well mixed. Add the oaths, baking soda, salt, and fruit/nut/chocolate combo. Stir well.

Allow the dough to rest for 20-30 minutes (especially important if you're using old-fashioned oats, because this allows them to become a little softer). Scoop the dough, by 1/4 cupfuls onto a baking sheet that has been lightly greased, or lined with parchment. Cook 12-15 minutes and allow to cool another 3-5 minutes on the cookie sheet, before trying to remove them.

Serve, or allow to cool completely and store in an airtight container for 3-5 days.


NOTE: You can also make smaller cookies (say 2 tablespoons, 1/8 cup). If you opt for this, keep an eye on them while they cook and reduce cooking time to 10-12 minutes. They should be golden brown around the edges when they are ready.

Sunday, December 23, 2012

Product Review: Enjoy Life Semi-Sweet Chocolate Chunks

Confession: I prefer using chocolate chunks in my baking over normal-sized chocolate chips. To me, it's more satisfying to bite into a chunk of chocolate, compared to a chocolate chip. The exception to this might be mini-chips, because you're pretty much guaranteed to get several in every bite.

Since one of my local grocers had the Enjoy Life (dairy, gluten, soy-free chocolates) semi-sweet chunks on sale, and because I have previously reviewed their mini chips, a quick note about the chunks seemed appropriate.

First of all, I find the white bag visually appealing on the store shelf. It's easy to spot, and sets these chocolate chunks apart from the browns and yellows that predominant the chocolate chips section of my local grocer. Score one point for that. I like it when I can quickly find the product I want -- it lets me escape the people who like to leave their carts blocking an entire aisle all the faster!

The chunks themselves aren't as MEGA as the bag would have you believe -- they're smaller than chocolate chunks I've purchased from other companies, which makes me a little sad, but at least they're still chunks! They have a nice, rich chocolate flavor and the ingredient list is short (if you don't understand the benefit of this, take a look at the ingredient list for any store brand of chocolate and see what I mean). These are friendly to all but the strictest vegans, and gluten-free (hooray! not all chocolate is gluten-free, which makes me sad). They aren't fair trade (or at least weren't when I checked in August and the bag still indicates they aren't), but the company assured me when I reviewed the mini chips that they work with the farmers.

I'm a skeptic on this point. But, hopefully they really are working in that direction and one day I can post an update that tells a different story.


Would I buy these again? Yes. Since they're spendy, I'd probably only buy these again when they're on sale. A fair number of chocolates are effectively vegan (though if you know someone very sensitive to lactose, you'd want to make sure they had chocolate that wasn't processed on machines that also process dairy) in that they don't contain animal products and gluten-free. But, with the sale at my grocer this week, this was cheaper than any of my other chocolate options.

Saturday, December 22, 2012

Cocoa Roasted Almonds

 Flavored nuts seem incredibly popular right now. Where I last worked, we often had a spicy chili-lime almond available, as well as toffee and mocha almonds. These made a nice snack, and, frankly can be pretty addictive (at least if you're me) -- but also a bit spendy, which is a problem on a small budget.

Fortunately, they can also still be (not too bad?) good for you because nuts are packed with protein and minerals. Almonds, in particular, work well because they're already naturally a little sweet and they don't seem to scorch as easily as some other nuts (walnuts, I'm looking at you!).

I had the chance to try straight cocoa roasted almonds after a martial arts seminar -- they're a great energy boost, and the small amount of quick sugar is nice after an intense workout. But, as Chelsey (whose post inspired the particulars of my version) points out, most of the commercial brands contains modified food starch of one type or another. I share her sentiment why?? modified food starch? Why?

I still use a highly processed flour here (sweet white rice flour), but I'm going to hold that that's still better than a modified version of a starch that's already starchy. It's not the by-product of a by-product. I opted for sweet white rice flour because it's already naturally a little sweet and very glutinous, which will help the cocoa powder bind with the agave.

That's right, this uses agave. It's vegan friendly, gluten-free, and has a lower glycemic count than the same snack made with many other sweeteners. If you have the option, buy your almonds in the bulk section of your local grocer -- it's probably cheaper than buying a bag of them and depending on your particular grocery store (and the time of year) the bulk almonds are likely a little fresher.

Cocoa Roasted Almonds
1 1/2 cups raw almonds
1 1/2 tablespoons agave nectar
1/4 cup cocoa powder
1 tablespoon sweet white rice flour (really, any flour would work)

Preheat oven to 275 degrees. In a small bowl coat the almonds with the agave nectar, stirring until the almonds are evenly coated. Set aside while you combine the cocoa powder and white rice flour in a separate small bowl. Add the almonds to the cocoa powder mixture and stir until the almonds are evenly coated. Spread the coated almonds onto a cookie sheet lined with parchment or a silpat. Roast for 25 minutes, stirring every 5-10 minutes so the chocolate doesn't scorch. Allow to cool completely before storing in an airtight container.


Thursday, November 22, 2012

Chocolate Mint Granola

You might say that I'm on a bit of a granola kick. This is, as I explained in a previous post, partly because I now live in an area where my GF cereal of choice isn't as cheap as I'm used to and I'm living on a fairly small budget. Granola, of course, is a little more expensive to make than just eating oatmeal, but it's also more satisfying when I want something crunchy (or if I just don't want hot cereal). Plus, during these cooler months of the year, it's an excuse to turn on the oven for an hour or so while creating something useful.

I'd been wanting to make a chocolate mint granola for a while -- in part because I love mint patties, but no longer eat them for a variety of reasons, and in part because I have mint extract from my green-mint smoothie phase earlier this year. I wanted to make it gluten-free, of course, and also vegan since I've embarked on eating mostly vegan.

This granola, like my others, isn't overly sweet, but if you drink vanilla soy / coconut /almond milk it is just sweet enough, and almost exactly the flavor of eating mint patties. For the record, I use organic spearmint extract when I make this granola, but I imagine it would turn out similarly using a peppermint extract. Note, these are both different than using mint oil. Baking Bites has a great article about the differences, that I won't rehash here -- but you should check it out. I like adding lentils to the granola, to increase the complexity of my morning meal, but you could omit them if you wanted (just skip those steps in the recipe below). I also like eating this with pumpkin seeds or sunflower kernels.

This would make a wonderful surprise breakfast for your kiddos who really, really want that chocolate sugary cereal from the grocery store since it's pretty much fat-free, doesn't contain much sugar, and still tastes like chocolate. Or, you could make a double-batch and wrap it up in pretty jars and give it as a holiday gift. Or, you could just make some for yourself, a small indulgence.
Yum! Chocolate Mint Granola (with red lentils)

Chocolate Mint Granola
1/3 cup split red lentils, boiled in 1 cup of water for 5 minutes and allowed to rest in hot water for 20-30 minutes (optional)

3 cups gluten-free rolled oats
1/2 cup brown sugar
1/3 cup cocoa powder
2 tablespoons agave nectar
1 1/2 teaspoons pure mint extract (note, this is different than oil)
1/4 teaspoon salt

Preheat oven to 275 degrees F.

Mix together your oats, brown sugar, cocoa powder, and salt in a medium-size mixing bowl.
Dry Ingredients
If using lentils, add the mint extract and agave nectar to the lentils and mix well (otherwise, mix the agave and mint extract together in a separate bowl with 1/3 cup warm water). Add the lentils, and their liquid, to the oat mixture. Stir until the oats are evenly moist.

Spread the granola on a baking sheet, and place in the oven. Bake for about 1 hour, stirring every 15-20 minutes, until the oats have turned dry and crispy* (in moist climates, this may take a little longer). Remove from oven and allow to cool completely. Store in an airtight container.

*Note: As with other granolas, it's important to remember that the oats will continue to turn crispy as they dry. If you have some oats that are not completely dry, but others that area, you can turn the granola once more time and then turn off the oven. In another 20-30 minutes, your oats should all be crispy.

Monday, November 19, 2012

Product Review: Whole Foods Grind-Your-Own Chocolate Peanut Butter

On a whim, I recently bought a small container of Whole Foods' grind-your-own chocolate peanut butter. Why, you might ask?

Why not?

At my Whole Foods -- and maybe this is the standard -- the grind-your-own chocolate peanut butter uses vegan, gluten-free chocolate chips (hooray!). The balance in the machine appears to be mostly peanuts with a handful of chocolate chips -- you can see there is chocolate in there, but it doesn't look like nearly enough to produce anything chocolatey.

But, when I hit the start button on the machine, the peanut butter that came out was a lovely dark brown.

The peanut butter itself isn't overwhelmingly chocolate-flavored, but there are distinct chocolate notes -- in fact it's moderately chocolatey (unless you're a dedicated choco-holic) which is nice for a small I-want-something-different treat (especially on banana chips!). The grind for the machines I used was set to create smooth peanut butter, which meant that however many chocolate chips I got were well-incorporated. It's definitely less chocolate-flavored than something like Nutella or the chocolate peanut butters by Peanut Butter & Co.

The price: reasonable at $3.99/lb -- the same price as the other grind-your-own nut butters (almond, peanut butter, and honey-roasted peanut butter) on the day I visited.

Would I buy this again? Possibly. While I love chocolate & peanut butter (when I'm in the mood for either), this is an indulgence as I don't see a practical use in my life for chocolate peanut butter on any regular basis. I can mix chocolate into peanut butter on my own, if I really want it right this minute, and I prefer almond and sunflower seed butters. I like that it's vegan and gluten-free (some chocolate chips aren't). I like that this peanut butter can be made ground fresh and bought in whatever quantity I desire.

But, those probably aren't enough things to cause me to run back to Whole Foods as soon as I'm done with the chocolate peanut butter I currently have, or to push me to purchase more at any point in the near future.

Tuesday, August 28, 2012

Product Review: Enjoy Life Mini Semi-Sweet Chocolate Chips

[Disclosure] Here's the thing about the product reviews I post on this blog: I always become incredibly self-conscious. I'm telling you this because I don't post as many reviews as I sometimes think I should (based on the frequency with which "review product x" comes up in how people linked to my blog via search engines), and simultaneously because I sometimes feel like I'm posting far too many reviews. For these reasons, I try to focus on products that don't seem to be reviewed on the interwebs quite as often. I've mentioned this with past product reviews, but if there's a product you want reviewed (that's gluten-free), let me know. I'll be happy to try and review it -- depending on availability in my area.

-----

Bag of Enjoy Life Mini Chips (semi-sweet)
Enjoy Life brand chocolate chips are vegan, gluten-free, nut-free, and soy-free, which makes them a prime candidate for review on this blog -- where a lot of my recipes try to take into account food sensitivities and preferences.

On a purely taste level, these simple chocolate chips have a lovely chocolate flavor with none of that weird aftertaste that say, Hershey's (or any number of other brands of chocolate) have that make me either want to eat more (but not actually enjoy it -- so typically American of me, at least if I'm to believe Jim Gaffigan's analysis of the American palate) to get the taste out of my mouth (because that makes sense) or leaves me feeling incredibly thirsty. I personally prefer a deeper chocolate flavor (the darker the chocolate, the better if you ask me!), but these work well for the things I use them for.

They're smooth and melt easily (sometimes too easily if you don't have air-conditioning) and because they're mini chocolate chips, they don't overwhelm delicate desserts if you're inclined to make things that need small bursts of chocolate (I don't have occasion to make these very often).

On another note the Enjoy Life website isn't the most appealing site in the world (mostly just the images of food). If I'd first encountered these chips via their website, I'd probably never have purchased them. However, that wasn't the case and at my local store, the mini chocolate chips are the only option -- though I'm interested in their chocolate chunks.

That being said, I've been trying very consciously to reduce the amount of exploitation that I enable through my purchasing decisions. These chocolates are not certified fair trade or organic. I contacted Enjoy Life about this, to find out if they're working with their supplies to ensure an enjoyable life for the chocolate workers and for the environment. Here's what they said:
Our chocolate is not fair-trade certified.  However, our supplier focuses on improving conditions for the cocoa farmers and is committed to operating in an ethical, responsible, and safe manner.  Unfortunately, at this time we are not able to source fair trade ingredients that meet our strict allergen free requirements. 
Okay, fair enough. But I still can't help but read it with a bit of skepticism. I admittedly don't know much at all about the production of chocolate and the facilities in which they produce their chocolate, but it seems like there shouldn't be much cross-contamination on the farms and plantations where at least some of the people in the cacao-to-chocolate production line work.

That being said, I'll probably continue to indulge in these chocolates from time to time.

Thursday, June 7, 2012

Road Food: Trail Mix

As a food-conscious (ethics, food-as-fuel) gluten-free vegetarian, road travel can be a bit of a pain especially if the trip is long enough that I'll want food more than once. I've learned not to rely on the usual roadside places to stop for something resembling a meal. There are a few exceptions I've come across over the years, including SeQuential, Tally's Silver Spoon (a restaurant), Planet Ozone and others depending on where I'm driving and how long I'm mentally allowing for stops, detours, and anything that isn't absolutely necessary.

I've learned to pack trail mixes (often hand-mixed) and fresh fruits and veggies (as long as I'm not driving into California, where I have to prove my produce's citizenship). I've learned to buy tofu jerky (I need to try making this still) if I think I'm going to be short on protein and want something besides nuts. A friend of mine packs hard-boiled eggs -- I might do this if I didn't hate how eggs make me feel. Another friend swears by peanut butter, on pretty much anything. These are all good solutions, and if there's space, I'm in favor of packing yogurt in a cooler for stomach-calming calcium and plenty of protein.

But back to trail mixes: I like to select trail mixes for road trips because I don't buy them on a regular basis. They feel special. I can include chocolate if I want (always a nice treat, and quick sugar), dried fruits, nuts & seeds, or a variety of other options. They can -- and probably should -- consist of complex & simple carbs, plus protein and fats. GORP is a nice standby, except I haven't been buying peanuts recently because I'm tired of them. Instead, I've been using sunflower seeds or soynuts -- salted varieties of both, if you were wondering.

For an upcoming road trip, I decided to indulge in a trail mix with a variety of dried fruits (but primarily cranberries & raisins) and almonds. I'm going to throw in a handful of chocolate and call it good, then pack a couple of grown in the USA apples with stickers attached, corn tortillas + nut butter, and a couple of small containers of yogurt. And then  I'm going to hope that's enough food for a several-day-total trip to a nearbyish city that will involve a lot of hiking and time outdoors. It's not as though I can't also opt into buying food there -- I'm sure I will, in fact (an avocado, some carrots)  -- but in case that doesn't make sense for my schedule I want a back-up.

Monday, May 28, 2012

Green Smoothie - Spinach-Mint

It's summertime (well, in just under a month) and I've been craving the fresh fruits and veggies that come with summer for quite a while now. Fortunately, my farmers market is already up and running and the local produce is coming in at the co-op and my favorite grocery store.

But beginning during the winter, when E and I were swimming several nights a week, I started making green smoothies. They were the perfect end to a workout, especially since we got home late and I didn't really want to eat dinner beforehand. The nice thing about green smoothies like the the one here is that some greens really start coming in over fall & winter -- and if you're on top of your game, you can get these greens fresh, cook them up and then freeze them in little smoothie-portioned chunks. If you're not on top of your game (and I wasn't this year, since I moved), you can also just buy frozen greens. Or, if you've got a better blender than mine, use fresh greens.

The mint extract in this smoothie helps tone down any bitter qualities of the greens, and the banana makes it smooth. Normally, as regular readers of my posts know, I'm not a fan of using bananas. Even when I buy them organic/fair-trade they're not the best environmental decision. Other options for making it smooth include: nut butters, yogurt, or (possibly) oats (my friend Marissa, over at We*Meat*Again just wrote about this possibility). 

If you have it on hand (which I do now--pineapple mint, if you're curious), you can also use fresh mint -- but it takes a lot more! The portions suggested below are just suggestions. If you think it needs to be sweeter (this may depend on the ripeness of your banana as well as your personal tastes), add some agave, honey, or other natural sweetener of your choice. Sometimes my smoothie comes out a little thick -- if this happens, just add a little water or more milk and that should solve the problem beautifully

Spinach-Mint Smoothie
1 cup almond milk (or other milk of your choice)
1/2 cup frozen spinach
1 large frozen banana, slightly thawed (again, unless you have a super-awesome blender -- which I don't)
4-5 drops mint extract or 1/4 cup fresh mint leaves, packed
1/4 cup chocolate chips (optional)

Add all ingredients to a blender, and blend until smooth. If you don't plan to drink it right away, store in a container that you can shake up later (in case of separation) and store in refrigerator.
Green Smoothie in a peanut butter jar

Saturday, January 14, 2012

Toffee!

Now that we've all had a little time to recover from the sugar-shock of the winter holidays, let's talk about candy. Specifically, toffee. I first had a variation of this toffee when a co-worker brought it in to a staff meeting. Hooray for buttery, sugary goodness during the holidays -- or something like that.

Toffees are made by boiling sugar (or molasses, apparently) with butter. The version presented here is akin to English toffee -- which according to my research pretty much just means that it uses almonds. The sugar-mixture needs to reach "hard crack" stage for hard toffees, which is what this recipe creates. This means getting the heat up to about 300-310 degrees Fahrenheit, so please be careful when you make this recipe. It needs attention, a lot of stirring (or more effectively, whisking), and precision. However, I label it "easy" because it doesn't take long and it's pretty forgiving if you err on the side of not getting it hot enough. If you scorch your sugar, I can't help you as much.

My version actually doesn't use almonds because almonds aren't very much in my budget -- and because I'd rather just eat the almonds I happen up (my current bag of almonds was a generous gift) than toss them into toffee. That being said, I've made this now with cashews "bits and pieces" as the store calls the cheaper cashews (cashew brittle style) and peanuts (very much like peanut butter), as well as chocolate covered. I also add vanilla, which the original recipe doesn't call for, mostly because I love the smell of butter cooking with vanilla and it adds just a hint of flavor at the end.

Let me tell you about my toffee "oops!" that happened with the last batch I made, specifically to send to a friend. I haven't been able to find my candy thermometer, even though I'm pretty sure it moved with me. And I don't have a different type of food thermometer. That means I have to eye-ball the confection getting to the right temperature. Fortunately, I've made candies before  and successfully made this toffee twice without thermometer. Unfortunately, I felt rushed and impatient. I didn't let enough of the water boil off or allow the temperature to climb quite high enough. The result? Even after the toffee sat in the freezer for several hours while I played frisbee with a friend, it didn't get hard. I felt grumpy.

I broke the toffee into bits and threw it back in my pan with just a sprinkle of water to encourage it to dissolve, then heated it slowly (medium heat) until it melted entirely before turning the heat back up to medium-high and stirring often as it bubbled furiously at me. The toffee bits had already been coated in chocolate, but this didn't seem have a negative effect. The next time I spread it on my cookie sheet and stuck it in the freezer, voila! I had hard toffee, just like I wanted--even if it did look a bit dark from the chocolate that also got stirred in.

So, the moral of that story: if it's under-cooked after you freeze it, just melt it and cook it again. The toffee would have been fine if I wanted soft, slightly-grainy pralines you so often find in certain parts of the southwest -- but wouldn't ship as well.

Since I don't keep corn syrup around, I used agave nectar. You could also use Lyle's Golden Syrup or honey.

Toffee Brittle
1 cup sugar
3 tablespoons water
1 teaspoon vanilla
1 tablespoon agave nectar
1/2 pound butter
1/4 teaspoon salt

Optional
5 ounces slivered almonds, OR
3/4 cup peanuts, cashews, or other nut/seed
Chocolate (about 2 ounces)

In a heavy-bottomed, medium-sized saucepan, over medium-high heat, combine sugar, butter, vanilla, water, and salt. Stir frequently until everything has melted and the sugar has dissolved. As the mixture begins to bubble and rise within the confines of the pan, switch to a whisk if you have one (this will pop more of the bubbles) and whisk rapidly until the mixture begins to thicken, darken, and pull away from the sides of the pan*. Stir in the nuts, if using, and leave on heat, continuing to stir for another 1-3 minutes. You want the mixture moderately thick.

Pour onto a baking sheet lined with parchment paper and smooth with the back of a spoon or spatula. Break up bits of chocolate and drop them on top, if using. They should melt pretty quickly**. Place baking sheet in freezer and allow to freeze until hard, about one hour. Remove from freezer, and (carefully) break toffee into bits using your hands. Store in an air-tight container.

*If you have a candy thermometer, stick it in as you're just starting to melt everything together and adjust it so that it does not touch the bottom of the pan. When the thermometer reaches just below 300 degrees, add the nuts.


**Hershey's candy bar melts really well, but -- it's Hershey's. I used Hershey's kisses twice because E had so many around the house from Christmas, but the last time I made it, I topped it with an organic FT dark chocolate. It didn't melt as well, but worked fine.
Toffee with Chocolate & Peanuts

Sunday, December 25, 2011

Chocolate Roasted Potato Cake

E and I recently hosted a double-birthday/holiday potluck. My friend whose birthday was approaching said she wanted something "chocolate," when I asked her what I could bake her -- not terribly helpful, but she's also super laid back, so I wasn't too concerned either.

I, however, don't like chocolate cake and even though I wasn't planning to eat any of it (even if I'd made it gluten-free, using my standby chocolate gluten-free cake recipe), I wanted to at least try to make something that wouldn't, well, be dry and tasteless. And, I told myself, I'm not on a budget that really lets me try multiple variations of things. So, whatever I did with a chocolate cake, I needed to make sure that it was something that I wouldn't mess up--or that I'd have alternate ingredients for if I did mess it up.

E suggested the brownies I posted in November. Doable, definitely. Even if I messed up the cake. But, this was an opportunity to try making something new and how could I pass that up? In recent weeks, I've felt barely able to write--or even think about writing--much less do anything more than put rather routine (for me) food in my mouth. I haven't wanted to be creative. My friend's birthday though, seemed like a good opportunity to spark some of that kitchen-creativity again. So, I thought: chocolate. And I thought: birthday. To me, this surely equals some sort of cake.

I remembered my friend Kim, a talented writer and generally wonderful person, had a potato party while I lived in the Midwest. She'd bid on a bushel of potatoes during an auction and won--and wanted help eating them all. One of the things she made: chocolate potato cake. And, I remembered seeing recipes for potato cakes (and sauerkraut cakes) in my parents' German cookbook.

I remember trying Kim's chocolate potato cake--before I went GF--and thinking that it was surprisingly good--and delightfully moist. And this, I decided, was what I wanted to make. But, most of the recipes I looked at called for unseasoned mashed potatoes. I understood that, to some extent. The process of creating mashed potatoes necessarily creates a little additional moistness. But I know how to make things more moist. I wanted to subtly up the flavor a little. I'm in favor of roasting things--especially in the winter, when I can also use it to warm up the house (though I pan roasted the potato for this, so not applicable). And because I didn't have enough potato for any of the recipes I looked at, I added a couple of carrots to the roasting process. I always have carrots on hand.

I also thought about making this cake into a Mexican chocolate cake, with cayenne and cinnamon. But I couldn't bring myself to do that either--at least not to the whole cake. It can surprise come as a surprise if you're not expecting all those extra flavors in your cake.

Chocolate Roasted Potato Cake

1 cup unseasoned mashed potato/carrot mixture (for me, this was one medium potato and two large carrots all finely diced which I pan-roasted for about 45 minutes before processing in my food processor until nearly smooth)
1 cup buttermilk
1 ¾ cups sifted all purpose flour
1 cup unsweeted dutch cocoa powder
2 1/4 teaspoons of baking powder
1/2 teaspoon baking soda
½ cup salted butter (softened)
1 ¾ cups granulated sugar
1 teaspoon vanilla extract
2 large eggs
1/3 cup mayonnaise
Confectioners’ sugar for garnish

Preheat oven to 350 degrees. Grease and flour two 9-inch round baking pans and set aside.

Place mashed potatoes/carrots into medium bowl. With a small whisk, gradually beat in buttermilk to form smooth mixture.

Sift together flour, cocoa powder, baking powder, baking soda, and salt.

In a large bowl, use an electric mixer to combine the butter, sugar, and vanilla extract until well blended. .
Add eggs and blend well. Add mayonnaise and beat at medium speed for 2 minutes.

At lowest speed, alternate adding both the dry ingredients (from step 3) and smashed veggies (a little dry ingredients, a little smashed veggies, a little dry, a little smashed veggies etc.) until all are incorporated.

Turn equal amounts of batter into prepared baking pans. Bake in preheated oven 27 to 32 minutes (for a 10” cake pan; 15-18 minutes for cupcakes), rotating once about halfway during the baking process.

Cake is cooked when a toothpick inserted into the center of the cake comes out clean. When done remove to a cooling rack. Cool completely before removing from pans and cutting. If desired, frost or sift confectioners’ sugar over top of cake after the cake has cooled completely.


Note: The pictures you see of the iced cupcakes use just a basic buttercream.

Thursday, December 22, 2011

Nilla Wafer BonBons & a Book Plug

In the middle of my holiday cookie making frenzy, E asked what bonbons made with Nilla Wafers would taste like. I wasn't sure, but agreed to make some (they look deceptively like the chocolate-peanut butter buckeyes I used to always make at Christmas, in part because I coated them in dark chocolate). What?? A new type of cookie? One where I get to be inventive? Yes please.

The process is basically the same as making tuxedoed oreos -- but (to me) less satisfying. There's something about blending the chocolate wafer cookie with the cream filling that I love. I had to add a little extra liquid to account for the lack of cream filling and the filling didn't initially hold up as easily. I also managed to give myself a first degree burn on my index finger pulling a bowl from the microwave that was oven safe, but apparently (no note on it one way or the other) not microwave safe. Alas, the hazards of the kitchen.

E didn't care for them as much as the tuxedoed oreos (I imagine the nilla wafer version is moderately flavorless moderately flavorless) but was curious what they would have been like with white chocolate. It's an interesting question and a good suggestion. If someone tries them, please let me know what you think. I also think they could be interesting made into smaller balls and served atop frozen bananas (maybe with a dab of chocolate to hold them in place). But then, I think vanilla wafer cookies should really only be used for banana pudding, if they must be used at all. Or spread with PB and stuck together to make little sandwiches.

However, these would be incredibly kid friendly, both to make and eat, much like the tuxedoed oreos. Speaking of kids, Erica, over at Kinds of Honey, just published her juvenile fiction eBook, Riding the Neighbors' Horses. I haven't read it yet, but I hope to soon, because Erica's a talented writer (and crafter, and many other things). I wanted to make sure to pass this information along though, in case you were looking for the right gift-of-words for some young person in your life.

Nilla Wafer BonBons


1 12-ounce box nilla wafers
6 ounces cream cheese, softened
1-3 tablespoons milk
Chocolate for coating (I used a little less than a cup)

Pulverize the nilla wafers using a food processor, or by placing them in a durable zip-top bag and pounding them with a rolling pin.

Combine cream cheese and wafer crumbs in a medium bowl, until well mixed. Add enough milk (if necessary) to help wafters and cheese form a very thick dough that isn't sticky and holds together when rolled in a ball between your hands.

Form balls (mine were a little smaller than ping pong balls) with the dough and place on plate covered with foil or waxed paper and then stick in the the freezer for 30 minutes-1 hour.

Melt the chocolate using a method of your choice either in a shallow bowl (or transfer to a shallow bowl once it is melted). Rolls the balls through the chocolate, using clean fingers or a spoon to guide the ball. Shake off any excess chocolate and then place back on the foil or waxed paper to set (this won't take long since the bonbons are cold). Store in the refrigerator until about 20 minutes before you are ready to serve.

Friday, December 16, 2011

Decorating Sugar Cookies

The other morning, as I walked the dog, I was able to witness the better part of the lunar eclipse, which as the moon sunk beneath the earth's shadow, caused me to think about chocolate dipped sugar cookies. Again, these are neither vegan or gluten-free, but I had the opportunity to make sugar cookies with E and our friends Caitlin and I*--and how could I pass that up? Especially if it meant the opportunity to take photos?

I remember, as a kid, that one of my favorite parts of going to the grocery store (specifically Winn-Dixie) was the opportunity for a free sugar cookie. It was a lovely once-a-week-ish treat (they didn't always have them) and those sugar cookies--probably Pillsbury or something similar in retrospect, and knowing what I know now about many grocery store bakeries)--were far superior to the ones from the recipe my mom had. The grocery store cookies were large and sweet and chewy, with absolutely no odd taste. I couldn't say the same for my mom's, which made approximately a zillioin--far too many for me to stay interested in decorating them--and were never as chewy, sweet, or just...sugar cookie flavored.

The cookies featured below are a perfect addition to a cookie exchange, or in the case of what I was creating for taking into work, a cookie platter at a party. You can dip them in chocolate, paint them with a basic milk-and-powdered sugar glaze, or add sugar before baking. I haven't tried them, but the recipe is a Julia child recipe so it's probably pretty yummy! E, Caitlin, and I* seem to like them.

We cut out "Christmas salmon," and "Christmas rhinos," moose and candy canes and gingerbread men, among other things. As the evening grew later and we all got punchier (sugar from cookies for E, Caitlin, and I* plus hot mulled cider for all of us), we started laughing about the idea of Christmas rhinos and the "guiding light" of the "Christmas lighthouse"steering us toward Jesus. We were, we decided, probably going to hell for that blasphemy.

In the write-up that follows, I made a couple of modifications to describe the roll-out and baking process we used. We also did not use a combination of cake and all-purpose flours, because we didn't have them and that change is also reflected in the recipe that follows.

I'm not sure which cookbook this originally came from--but we all thought since it was Julia Child, it was sure to be good. Caitlin, who brought the recipe, brought it on an index card. We actually tripled the recipe--and therefore, worked on this for a good three hours.

Julia Child's Sugar Cookies

1 cup all-purpose flour
1/4 teaspoon salt
4 ounces (1 stick) chilled butter, cut into 16 pieces
3 tablespoons granulated sugar
1 egg yolk
1 teaspoon pure vanilla extract
1 tablespoon cold water, plus droplets
more water, if needed
  
Measure the flour, salt and butter into the container of a food processor and process about a minute, until the butter is thoroughly blended (you can also use two knives, or a pastry cutter, if you have those on hand and don't have a large enough food processor--we definitely don't). Add and process in the sugar, then the egg yolk, vanilla and water. Continue processing for several seconds, until the dough masses. Turn it out onto your work surface, form into a rough ball, then push out 2-tablespoon bits with the heel of your hand in 6-inch smears. Gather together into two or three small balls and refrigerate until well chilled, at least 1 hour. Roll out on a lightly floured surface and cut out the cookies, placing them on a lightly greased cookie sheet. Bake at 350 degrees for 4-7 minutes (depending on the size of the cookie), or until cookies are golden around the edges. Decorate when cooled, if desired.

Tuesday, December 13, 2011

Tuxedoed Oreos (repost)

I originally published this recipe -- by no means original -- a year or so ago, but since it's so appropriate for the holidays, I wanted to post it again. I just made these during a cookie-making party E and I held, and here are pictures of the little beauties.

They're best if they've had a day to marinate -- the filling becomes creamier, more like a bon-bon. You can keep them in the refrigerator, or leave them on the counter (but only for a couple days). I recommend keeping them in the refrigerator, if possible. I'll be making more for a holiday party soon.
From the first snow of the season

It's not absolutely necessary that you use oreos -- a chocolate-vanilla wafer cookie generally (and generically) works well, as long as you like the flavor of the initial cookie. Oreos, however, are vegan, and you can use vegan cream cheese if you want to make these vegan (though if you choose this measure, make sure you choose a vegan white chocolate -- they do exist, but some types contain milk products). These are definitely not gluten-free.


They are easy though, and pretty much no-bake (okay, they are no bake, but a microwave or stove top is useful for melting the white chocolate), which makes these an activity kids can help with easily!


Oreo Bon-Bons

1 pound reduced-fat oreos
1 8-ounce block neufschatel (reduced fat cream cheese)
Powdered sugar for coating OR
White Bark coating (about 1/2 pound) (recommended)

Smash the oreos so no huge chunks remain. This can be done with a gallon bag and a rolling pin--just be sure to get all the air out of the bag before you start hammering it. Or, you can toss them in your food processor and pulse it to break up the cookies. In a large bowl, using a fork, mix together the cream cheese and oreos until the color is even and it starts to come together to form a ball.

Roll small, equally sized balls of the cookie-cream cheese mixture. These can be any size you want, but it's easier to coat these if they're evenly sized--especially if you're using the white bark coating. Chill the small balls for an hour or two (stick 'em in the freezer), until firm.

Spread the powdered sugar in a shallow dish, if using, or melt the white bark coating (follow instructions on the package, but generally you can do this in a double-boiler or by microwaving it on HIGH for 1 minute and then stirring. Microwave on HIGH for additional 15-second intervals until it is completely melted).

Dip or roll the balls through the powdered sugar or melted white bark. Let set and then store in refrigerator.

Monday, November 21, 2011

Deep Chocolate Brownies

Let's face it. Sometimes we crave chocolate. According to some people, chocolate cravings--especially cravings for dark chocolate are indicative of a magnesium deficiency. I've been craving dark chocolate, but unadulterated by anything else. 
Brownies, up close and personal
A word of warning: These brownies aren't vegan. Or gluten-free. If you're looking for something healthy--also not it. This is death-by-chocolate, rich dessert. After all, they're deep chocolate brownies. And this type of indulgence is just the type of pick-me-up that you might want for a rainy (literally or figuratively) day, or for a fun baking project for a day with frost on the windows and snow falling outside.  

So, these aren't brownies that I can eat (or should eat, perhaps, since I know if I did they'd make me feel icky). Why'd I make them? E asked me to make brownies and so that's what I did. I made "normal people" brownies, because I have yet to find a GF brownie recipe that I particularly like. Part of this, I think, has to do with the grittiness of many GF flours. And part of it, in all honesty, has to do with my lack of love of most brownies.

I spent some time trying to figure out a good recipe for chewy, fudgy brownies because that's what E wanted. Thank goodness. I have no patience for chocolate cake or cakey brownies--just make cake, if that's what you want. And maybe, possibly, don't make it chocolate. But you read about my chocolate cake biases in the pumpkin cake post. Long story short, I found two recipes I thought looked pretty good and which provided lovely explanations for how the authors got to the recipes they did. One had more chocolate -- and three types. One had brown sugar (entirely, instead of white sugar) and a lot less butter. I combined these two recipes, pulling out what I considered the best aspects and created this recipe. E and our friend Caitlin swore this was a good recipe, so you'll have to take their word for it--plus a few co-workers, who also had the opportunity to try them. One described these brownies as "not too cakey, not too flat, not too fudgy. You could put frosting on it and call it cake." They smelled absolutely lovely as it baked (and all night).

With whipped cream
I served these with fresh whipped cream after making/serving a lovely butternut squash stew (more on this in another post) and a variation on Mark Bittman's no-knead bread, as the conclusion to an autumn dinner party. If I'd had it (and if E liked it), I might have put small curls of candied ginger. If I were to make more whipped cream and had a lemon on hand, I might put lemon zest on the whipped cream, because lemon and chocolate are a lovely combination.

I love baking new projects and E's a willing subject, especially if it involves chocolate (thanks E!). If you have suggestions for things you'd like to see, let me know! 

Deep Chocolate Brownies
6 oz. semisweet or bittersweet chocolate, chopped
1 oz. unsweetened chocolate, chopped
8 tbsp. unsalted butter, cut into quarters
1/4 cup cocoa powder
3 large eggs
3/4 cup sugar
1/2 cup brown sugar
2 tsp. vanilla extract
½ tsp. salt
1/2 teaspoon ground cinnamon
1 cup (5 oz.) all-purpose flour

Place an oven rack in lower-middle position and preheat the oven to 350° F.  Grease a 9" pie pan.

In a heatproof bowl set over a pan of barely simmering water, melt the chocolate and butter, stirring occasionally until smooth.  Whisk in the cocoa powder until smooth.  Set aside to cool.
In a medium bowl, combine the eggs, sugar, vanilla and salt; whisk until combined, about 15 seconds.  Whisk in the warm chocolate mixture until incorporated.  Then stir in the flour with a wooden spoon until just combined.  (It took me a while to get the flour evenly incorporated and I was worried it would affect the texture of the brownies, but they turned out fabulously – no need to worry.)  Pour the mixture into the prepared pan and spread with a spatula to make an even layer.  Bake until slightly puffed and a toothpick inserted in the center comes out with a small amount of sticky crumbs clinging to it, 35-40 minutes.  Transfer the pan to a wire rack and let cool to room temperature, about 2 hours.  
Slice as you would a pie, creating about 24 slices.  Store in an air-tight container.   

Sunday, November 13, 2011

Vegan Chocolate Pie with Coconut Crust

Lately, I haven't really wanted sweets. Probably that's a good thing. But I have wanted chocolate. Not just any chocolate, but really dark chocolate. If it's not dark chocolate, I'm not interested. I could keep this trend, except I'm kinda also getting sick of chocolate--even while I still want it. I might resort to buying either the ridiculously dark chocolate or cocoa nibs, except those are outside my budget.

I'm hoping this pie will cure me of wanting chocolate. I've been wanting to make this pie for a while, but actually got around to making it because I had a friend coming to town. A friend who appreciates dessert. A friend who's open to trying the oddball things I make. Willing guinea pigs are always nice to have around. And I'm also hoping E will help me eat some of it. There are plenty of variations of vegan chocolate pie around. The type I like, I originally got from Alton Brown's "moo-less" chocolate pie and have since modified somewhat. But I wasn't sure what the point of this pie was--true, Oreos are vegan*, but if you're aiming for something that's a little healthier--this isn't necessarily the pie for you. On the other hand, maybe you're just lactose-intolerant and this works fine for you.

This is, however, a pie I like. It's smooth and silky. This variation is pretty light and fluffy (there are versions that are slightly heavier). It's got a fair amount of protein. It's quick to put together. It usually makes a pretty presentation. Since going gluten-free, I've made up the filling and eaten it like pudding, once. But it's so much more fun (and impressive) as a pie.

A friend of mine makes a really fantastic gluten-free pie crust for coconut cream pies and pear tarts, with coconut flour and/or Bob's Red Mill GF All-Purpose, coconut flakes, and sometimes even coconut sugar. My goal wasn't to replicate this crust (though I might need to ask how she does this), but just to use it as a jumping off place for a slightly less sweet crust. I think the pie is plenty sweet without a sweet crust, and I think it's fun to have the contrast between the crust and the pie filling. I used agave sugar, rather than sugar, in the crust and flax to replace the egg binder most pie crusts use. To replace the butter, I used a vegan substitute.

Edible Flowers
This pie is pretty forgiving flavor-wise. I've offered a few alternatives I've tried in the past with the filling, but I imagine lavender essence could be used to replace the vanilla, or that, if you were so inclined, you could even incorporate lavender blossoms (dried) into the pie. Or, you could top slices of the pie with individual edible flowers, like poppies or pansies. As you consider serving the pie, think about how you might plate it, based on the flavor profiles available in the pie -- chocolate-covered coffee beans, peppermints or mint leaves, candied orange peel, or raspberry sauce squiggled over the plate before you slip the slice from the pie dish. Presentation, I'm told, can make a huge difference in how people perceive your food--and if you're using a high quality chocolate, you can play up flavors already present in the chocolate as you plate it.

Vegan Chocolate Pie with Coconut Crust
For the crust:
1/2 cup coconut flour
1/4 cup quinoa flour
2 tablespoons vegan margarine
1/4 cup unsweetened coconut flakes
1 tablespoon flax mixed with 1/3 cup cool water
2 tablespoons agave nectar
Olive oil

For the pie:
12 ounces Mori-Nu soft silken tofu
1/4 cup almond milk (or other dairy free milk, or coffee, peppermint orange or chocolate liquor**)
1 tablespoon agave nectar
1 teaspoon vanilla
8-9 ounces vegan semi-sweet chocolate

Crust:
Cut the butter into the flours until it resembles coarse crumbs. Stir in the coconut flakes. Add the flax-water and agave nectar and stir until it forms a very loose dough (it should not form a ball, but should hold together when pressed). Add more water, 1 tablespoon at a time, if necessary. Press the dough into a 9" pie pan lightly greased with olive oil. Prick bottom of crust lightly with fork. Cover and refrigerate at least 1/2 hour.

Preheat oven to 350 degrees and bake the pie crust 15-18 minutes, until it turns a light golden brown. Remove from oven and cool completely.
Coconut Crust

Pie:
After the pie crust has cooled, blend the tofu, almond milk, agave nectar, and vanilla in a blender until smooth. Meanwhile, melt the chocolate in a double-boiler (or very heavy bottomed sauce pan) over low heat, stirring often to avoid scorching. Once the chocolate has fully melted, scrape it into the blender and process until well mixed, scraping down the sides, as necessary.

Pour the filling into the crust, cover, and refrigerate at least 2.5 hours, or until the pie filling has set. Serve cold.

*Though not necessarily made with vegan sugar. And this depends on where you live in the world. In some places, apparently Oreos contain whey powder, which makes them non-vegan.

**I've also made this with peanut butter and sunflower seed butter, both of which work well--but didn't seem like they would be the best compliments to a coconut-based crust. If you're looking for something like a healthier chocolate peanut butter pie, you could certainly incorporate peanut butter or another nut butter into this, or layer peanut butter on the bottom and pour the chocolate-tofu filling on top. One day, I might post one of these recipes.

Monday, October 31, 2011

Fancy Dipped Apples, Cupcake Monsters, and Were-rabbits

Apple of My Eye
No recipe this time. I'll just put that out there right now. But I've been walking past these apples at least once a day for the past week (or at least ones that look like these apples--hopefully not actually the same apples) and they were too Halloween-y adorable not to share. Something to aspire to, perhaps, if I want to ruin a perfectly good apple in order to decorate it.

Were-rabbits
A friend of mine went to culinary school and I remember listening to her talking about her chocolates classes -- and being amazed by the beautiful creations she came up with. Creations like those, and like these apples and were-rabbits, are exactly the type of thing that makes me want to seriously investigate how to work with chocolate, maybe even take classes. But then, I think of all the things I could better use that money for. And so instead, I consider possibly working at a place that would teach me how to make creations like these. I haven't ruled that out yet.


One thing I've got to say about Halloween--and other holidays--is that it certainly makes walking past bakeries, chocolate shops, and other such places much more interesting. I've already posted a picture of a "pan muerto" from our local growers market. In fact, I like window displays a lot when it's holiday time--especially when people aren't too terribly concerned about the political correctness of their displays. I think too, even in my Halloween grumpiness this year, the window displays in town have helped me feel a little more in the spirit. It's hard to not feel a little bit of fondness for the holiday when there are skeletons in wedding dresses, apples like these, little monster cupcakes, etc. Last year, in my previous town, I took pictures of fancy cupcakes at my favorite bakery (pictured left). The lighting was pretty horrible for pictures, but you get the general idea.
Such cute monsters...though I'm not
a fan of the pipe cleaners.

In my mind, one of the big problems with specialty cupcakes is that amount of frosting that's used. Maybe I only feel this way because I'm not a huge fan of frosting--or dye--but also because these specialty cupcakes (even ones that are much less fancy-decorated than these) cost so much, when really the ingredients are often very cheap to buy. The profit margin must be huge--and for products, that when I've tried them, aren't really worth it.

Speaking of things I'm not a fan of: caramel apples. That's a little ironic, perhaps, considering that was the impetus of this post. However, I don't understand why anyone would ruin a perfectly delicious apple by putting caramel on it--much less dipping it caramel and peanut butter. Or caramel and M&Ms. Or, well you get the point. I don't care much caramel, but even if I did, this just seems like a sugar-overload. I'd love to hear from a few of you who like caramel apples. Why do you like them and when do you eat them? People's food memories are always great.

The average American eats about 120 apples a year (hm, considering I pretty much eat an apple a day most of the year, that makes me concerned for the low consumption by other people). The average caramel apple has between 230-340 calories, according to one site I found. But these are (white) chocolate dipped apples--and probably "cost" a lot more than 700 calories. I'm guessing this number, because one of the only uber-indulgent caramel apples I could find statistics on, Rocky Mountain Chocolate Factory's Apple Pie Caramel Apple, supposedly contains more than 700 calories.

Something maybe we should eat more of? The relatives of these carved babies. Pumpkins you carve are edible but they're not super good like the smaller pie pumpkins. E, her boyfriend, and her co-worker K carved these beauties last night. E's boyfriend and K both carved pumpkins they'd grown and I'm proud (or something like that) to say E's pumpkin was "pamper'd." The label said so. Hers is the eye. And it's a little blocked by the boyfriend. Alas. Happy Halloween.

K's kitty in the window, A's Jack, E's Eye