Pages

Showing posts with label beans. Show all posts

Friday, January 20, 2012

Oven Roasted Chickpeas

It seems like a lot of bloggers recently (the past year or two, anyway, if that really counts as recent) have written about oven-roasted chickpeas. They're a good, high protein snack, moderately cheap to make (especially if you're not buying a can of them--or if you get said can on sale), and you can flavor them a lot of different ways for different tastes. They store well for hikes or trips to the zoo, they're easy to eat with fingers (making them good for kids, or for road-trips), and they're (depending on what you put on them) mostly or very "whole" as in non-processed.

The first time I read about these was about two years ago. The first time I tried them: about 18 months ago. The first time I tried freshly made ones, with Annie, last spring. I thought she'd blogged about it -- but then I couldn't find it on her site.

The recipe below is for a savory (and very garlicky -- now there's a surprise) roasted chickpea. I started with dried chickpeas that I soaked for about 24 hours before cooking in lightly salted water. They cooked up very quickly though, about an hour and then roasted for about 40 minutes at 375 degrees--the same temperature I needed for baking brown rice. Convenient!

The chickpeas came out crispy on the outside, some a little soft on the inside, and because I live in a fairly dry environment, they didn't go soft again too quickly -- a complaint I saw others making on other blog posts.

Garlicky Oven-Roasted Chickpeas
12 ounces cooked chickpeas
1 tablespoon (or a little less) olive oil
1/4-1/2 teaspoon garlic powder (to taste)
1/4-1/2 teaspoon onion powder (to taste)
Pinch salt

Preheat oven to 375 degrees. Mix all ingredients together in a bowl and then spread on a foil- or parchment-lined cookie sheet. Bake  about 40 minutes, stirring 2-3 times during the cooking process to avoid scorching.


Monday, January 16, 2012

Garlicky Pinto Beans & Rice

Sometimes, for me, a simple meal is just what I need to focus on taking care of myself a little better. This isn't to say that I haven't been taking care of myself--but when I'm stressed, or tired, or feeling conflicted I don't always eat as well as I could or should. It's times like these that I need the reminder that easy foods can taste amazing and that there's a lot of cooking that can go on with my immediate supervision.

This is a simple dish of pinto beans and brown rice, meant (for me) to be a cleansing meal. Not Cleanse, like the fad diets, just a means of eating and living intentionally. I soaked the beans while I was at work, then stuck the rice in the oven when I got home, and turned the beans on to simmer while I walked the dog, cleaned the kitchen a little, and generally tried to focus on doing things that would help me feel better.

For the rice, I used a variation on Alton Brown's oven-baked brown rice, which I'll post about soonish.

Garlicky Pinto Beans
1 cup dry pinto beans, soaked for at least 8 hours in lightly salted water* if you've got the time (otherwise just cook them longer)
1/2 cup chopped onion
4 cloves garlic, minced
1 teaspoon pureed chipotle, or more to taste
3 cups water or veggie broth
At least 1/2 teaspoon salt*

Combine all ingredients (including soaking water if you've pre-soaked--just try to adjust the amount of water/broth you add to equal about 3 cups total liquid) in a medium sauce pan over medium-high heat. Bring to a boil, then reduce heat so that the beans will just simmer. When the beans are tender (about 40 minutes, depending on how long they soaked and how old your beans were) adjust salt if necessary.

*Don't add additional salt until you've tasted the cooked beans if you used salted soaking water.

Monday, December 19, 2011

Peanut Butter Blondies (gluten-free)

 
You'll have to trust me on this one. I've been eyeballing black bean brownie recipes for a while (I was reminded of them after reading about garbanzo bean brownies by my friend Victoria over at Easy Gluten Free). And for longer than that, I've been meaning to make a pot of beans (either black or pinto) and haven't gotten around to it--I want to start a crockpot of beans one morning and come home to it in the evening. Why haven't I? Good question. You'll know when I make them, I'm sure.

This recipe came about because I intentionally bought black beans so I could make black bean brownies. But when I got home, I discovered I hadn't bought black beans after all, but pinto beans. Sigh.

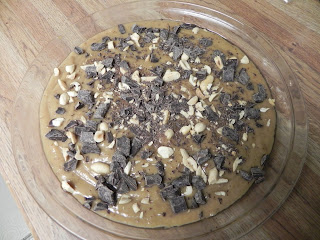
Look at the chocolate and peanuts!
Okay, I'm sure pintos would've worked just fine in brownies. They're pretty mild, after all. But black beans definitely wouldn't work in blondies and since I had a set of beans that would work, I decided to go with it. The pinto beans replace the flour in this recipe and add protein, without leaving a bean-y taste (at least if you've rinsed them well.). You'll notice in the picture, I have a carton of coconut milk--but I decided once everything was mixed together that it didn't need the couple of tablespoons of milk called for in the recipe I based this on. 

These blondies are also pretty low fat (for peanut butter blondies). I used up the last tablespoon of butter E and I made recently, mostly to get it out of my fridge, and because I wanted to up the peanut butter flavor by increasing the peanut butter from the 1/3 cup called for in the original recipe to 1/2 cup.

These blondies, when warm, practically melt in your mouth. They're super-moist, and nicely peanut buttery. The peanuts and chocolate on top add a nice bit of spunk (both presentation and flavor-wise), but if that's not your thing, then by all means leave the topping off.

Peanut Butter Blondies
1 can pinto beans, well rinsed
¾ cup granulated sugar
1/2 teaspoon baking powder
1/4 teaspoon salt
1/2 cup creamy peanut butter
1 tablespoon butter, melted and cooled slightly
1 teaspoon vanilla extract
2 large eggs, lightly beaten
2 tablespoons ground flax
1/4 cup semisweet chocolate chips or chocolate chunks, chopped

2 tablespoons unsalted peanuts, chopped
Cooking spray

Preheat oven to 350°.

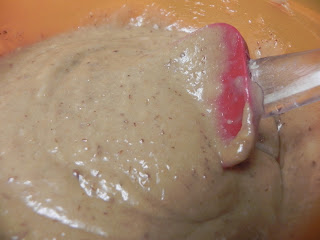
Place the pinto beans and sugar in a food processor and process until smooth.
Blended Pinto Beans & Sugar
Transfer into a medium-sized bowl and add the baking powder, salt, peanut butter, butter, vanilla, eggs, and flax and combine well.
Combining well
Pour into a lightly greased 9” pie pan (or 8 x 8 baking dish).

Sprinkle the chopped peanuts and chocolate chips on top of the batter.
Adding Chocolate and Peanuts
Bake at 350° for 25 minutes or until a wooden pick inserted in center comes out with moist crumbs clinging. Cool in pan on a wire rack.
Yum!

Saturday, July 9, 2011

Huevos Rancheros with Garlic Smashed Black Beans and Goat Cheese

Growing up, I ate Mexican food fairly often. My dad was raised in Texas and although my mom moved around a lot, she spent high school and college in Texas. When my dad was transferred to North Carolina in the mid 1980s, we discovered we discovered a lack of Mexican food. In city I grew up in, Mexican food options consisted of not much--and the only place even remotely close to the part of the city we lived in microwaved their entrees. Tex-Mex wouldn't even describe it--Taco Bell was a more authentic experience.

Fortunately, my parents had learned how to make Mexican food a decade earlier, when they lived in DC and had gone to Pizza Hut for the "Mexican Pizza" just because that was as close as they could get to the food they were used to finding everywhere. We made tamales, fish tacos, beef tacos, carne verde, and other dishes--including things like enchiladas and nachos that most restaurants would serve. We had Mexican or Tex-Mex at least once a week. Fridays, for years, were "taco night," at my house.

But huevos rancheros. That was a meal we had at least once a month, on a Saturday or Sunday, when my dad liked to make large breakfasts. Eggs and I don't always get along and so for years I'd get him to scramble mine, or just opt to eat refried beans and tortillas. I frequently opted for just beans and tortillas (and for that matter, still do).

The one restaurant we make sure we eat at when we visit family in San Antonio, Texas is The Original Donut Shop ("Hot Donuts" is what we call it), which has been in business for around 60 years. My dad ate there from time to time as a small child, and as my grandmother moved toward dying, the hot glazed donuts were one of the few things she would still eat voraciously. For years, The Original Donut Shop was only a donut shop (there are an unbelievable number of donut and kolache stores in Texas) but at some point it expanded into a cocina Mexicana as well and serves everything Mexican-breakfast from egg tacos to menudo (only on Saturdays) to, you guessed it, huevos rancheros. All meals are served with hand-patted flour tortillas (which I'll miss terribly now that I'm not eating gluten. Even thinking about it makes me a sad) that melt in your mouth.

There are dozens of ways of preparing huevos rancheros--but the way I enjoy them most involves poached eggs and no ranchero sauce (which I swear is just an invention of the Tex-Mex aisle in grocery stores, like "curry powder" to Indian food). This is the way my family made them (except when I requested scrambled eggs). We topped them with Paces Picante sauce, or with a homemade salsa, depending on what we had on hand. This is the way The Original Donut Shop in San Antonio makes them, except with fried egg and with bacon and browned potatoes on the side. This is the way my friend Anna made them when I was in Columbia, Missouri with Annie for True/False (a film festival) earlier this year.

Anna's variation interested me because unlike the versions I grew up eating, she smashed whole beans and simmered her eggs in store-bought enchilada sauce rather than a traditional water-poaching. We ate our huevos on top of stove-top crisped corn tortillas, smoothed with black beans, topped with and egg, and drowned in the enchilada simmer sauce. The meal presented beautifully and was filling--good for a day of wandering around Columbia and watching documentaries.

I resolved to make a variation of this for Friday breakfast the following week. Friday breakfast is an almost three-year tradition with my friend Rachael. Annie and Brenna joined this tradition about six months later. Friday breakfast forces us all to eat a real meal at breakfast once a week, gives us an opportunity to talk about our frustrations and success for the week, to discuss weekend plans, or boys. Rachael, Annie, and I are moving to separate cities soon and the thing I'll miss most about living where I do now may well be the tradition of breakfast with these three women.

Huevos Rancheros with Garlic Smashed Black Beans
Serves 4
2 teaspoons olive oil (just enough to coat the bottom of your pan)
2 garlic scapes, chopped (or about 1 tablespoon minced garlic)
1 14-ounce can black beans, drained and rinsed
2 teaspoons whole cumin
Water

1 8-ounce can tomato sauce
Taco spices
Water
4 eggs

4 corn tortillas*
Soft goat cheese (optional)

In a small sauce pan, heat the oil over medium heat and then add the garlic scapes or garlic, Saute 1 minute and then add the black beans. Heat, stirring occasionally, until bubbling. Smash the black beans with the back of a fork or spoon and add the cumin seeds and 3-4 ounces of water (or until desired consistency) and heat through.
Black Beans with Garlic Scapes

Meanwhile, heat the tomato sauce, 8 ounces of water, and taco spices (to taste, I used about a teaspoon of a taco seasoning mix my dad makes) in another small saucepan, or a skillet big enough to hold four eggs. When just simmering, crack the eggs into simmer-sauce, being careful not to break the yolks. (If the yolks break, no worries--you just won't have a runny yolk, but it'll still taste fine.) Return to a simmer and then cover the pan and reduce the heat so the sauce continues to just simmer for 3-5 minutes, depending on the size egg you're using, until the white appears cooked.

Heat your corn tortillas and spread one quarter of the black beans on each tortilla.
Smashed Black Beans Spread on a Tortilla
Using a large spoon, carefully remove your poached eggs from the simmer sauce and place one on each tortilla, the cover in remaining simmer sauce.
Topped with Egg & Simmer Sauce

Top with goat cheese (in the picture below, I'm using a soft herbed goat cheese). Serve hot.

*If you're not trying to create a gluten-free meal, feel free to use small (6") flour tortillas instead.

Tuesday, July 5, 2011

Barbecue Hummus!

Hormel Nature Center Wildflowers, West Prairie Loop
I had the opportunity this weekend to go visit a friend who is living in Austin, Minnesota for the summer. My friend and I biked around town (deviant behavior! Most people drive everywhere, though the town is small, with wide streets and wide shoulders) and visited the Hormel Nature Center (aside from the people finishing up a bike race, we were the only people we saw the entire time we wandered) where we walked about four miles, looked at prairie flowers and grasses, waded through streams, and got attacked by swarms of hungry mosquitoes. After this, we biked to Hy-Vee grocery and picked up supplies for dinner. I wore sunglasses pushed back on my head and we both had on backpacks. My friend pointed out that at least one person gave us a strange look. We bought grapes, apples, and peaches (apples and peaches for immediately consumption), and the black-bean burger ingredients his pantry was missing. At the checkout, I told the bagger I didn't need a bag--I'd just put things in my backpack. Another strange look. My friend said the same thing and the bagger looked disgusted with us.

You should know, when I arrived, his host parents asked first if I was a cyclist also (yes), and if I was also a vegetarian (yes). Austin, Minnesota, if you didn't know, is the home of Hormel and, as my friend later shared, his host family makes gentle (my interpretation, not his) fun of anything remotely deviant. They consider his bike to work (3 miles) a long bike. He has a car there, he just doesn't use it--and is considering getting rid of it altogether.

While we were making Veganomicon black bean burgers (with vital wheat gluten and bread crumbs despite my suspected gluten sensitivity--he knows about this and offered to leave both items out; I didn't feel like trying to figure out how to fix it if it went wrong and now thing that these could both be left out with no problem, fyi if you decide to try the recipe), my friend mentioned that since his experiment with Swiss chard hummus worked out, he wanted to try making barbecue hummus next.

Barbecue hummus! What a great idea (crediting this to him)! I asked how he planned to make it barbecue flavored and he responded "um, with barbecue spices, I guess. I thought about using barbecue sauce but decided that would be cheating." I agreed (though that didn't make the idea of using barbecue sauce less appealing--there are a couple of barbecue sauces made locally that I adore). My mouth watered for barbecue hummus after my friend mentioned this plan.

And so when I got home Sunday, I proceeded to make my own variation of barbecue hummus. I wanted to use up some of my dried beans, so I used about 1/4 pound of dried lima beans and a cup of red lentils (I didn't measure, so this is very approximate). I soaked them before cooking, and cooked them on medium heat for about an hour, adding water as needed. I added minced garlic halfway through the bean cooking time, and at the end, added barbecue spice (which I had on hand as a "free" sample--meaning if I came in and spent at least $5 they'd hand me a tiny jar as a reward--from the local bulk spice dealer, Penzey's). The result: delicious!

I don't currently have tahini, so it isn't included in this recipe, but if you have tahini and like it in your hummus (and I do, don't get me wrong) you should definitely add it.

Barbecue Hummus (amounts are approximate)
1/4 pound dried Lima beans
1 cup dried red lentils
Water
1 tablespoon minced garlic
1 tablespoon barbecue spices (I used BBQ 3000), or to taste
2 teaspoons smoked paprika
1 tablespoon lemon juice
1/4 teaspoon salt, optional, to taste

Soak your limas and lentils by boiling them in water (I use approximately a 2:1 ratio for soaking) for 1 minute and then covering and allowing to rest, off the heat, for 3 hours. Add more water (I like my hummus thin, but not runny) and boil the beans and lentils for 30 minutes, adding water if needed. Add the garlic and continue to cook another 30 minutes, or until tender. Stir in the BBQ spice, paprika, and lemon juice, then blend until smooth (I use an immersion blender, but a food processor or mashing by hand would work also) . Taste and add salt, if desired.

Chill and serve.

Note: The hummus will thicken as it cools. Also, there aren't pictures of the hummus itself, because it turns an unappealing (on the camera) color. Mine looks prettier in person--BUT the exact color will vary based on the spices you use.

Monday, February 7, 2011

Vegan White Chili


The Midwest has gotten blasted by cold air (again!) this week. We're seeing highs in the single digits (gasp!) before the wind chill for the first part of this week. This seemed like the perfect excuse to make a hearty chili. A while back I purchased some white chili blend from Pendery's Spices, but I hadn't experimented with it. Chili generally feels heavy to me--but I know it'll feel even heavier when the weather starts getting warm again.

The basic recipe comes on the chili-blend package and calls for chicken. I use seitan instead. You can make your own seitan--there are a lot of recipes available on the internet, or you can buy a mock chicken product. There are many varieties of mock chicken products out there and in this recipe, I use one made by White Wave.

I keep telling myself one of these days, I'll make seitan. But then I keep telling myself one of these days, I won't be a poor, time-crunched student. Maybe.

You could also make this chili gluten-free by increasing the number of beans and withholding the seitan altogether. Seitan is made from vital wheat gluten and therefore can't be given to people with wheat or gluten intolerances/allergies.

My vegan version of white chili(double everything, if you want) is below:

Vegan White Chili

1/2 pound baby lima beans (or other small white bean), soaked 6-8 hours or overnight and then cooked, according to package instructions, approximately 1.5-2 hours, depending on the type of bean you use.


While the beans are cooking, prepare the rest of the chili:


3 tablespoons olive oil, vegan margarine, or a combination
1 large onion, chopped
2 cloves garlic
1 4-ounce can drained, chopped green chiles
2-3 fresh jalapenos, or to taste, chopped*
4 ounces seitan
1/2-1 cups low-sodium vegetable broth, depending on how thick you like your chili
1.5 tablespoons white chili blend
Salt
Freshly cooked brown rice, quinoa, or wheat berries


Heat the oil in a medium pan, over medium heat. Add the onions and saute 2-3 minutes, until translucent. Stir in the garlic and cook one minute more. Add in the canned chiles and jalapenos. Saute 2-3 minutes, until the jalapenos start to get limp. Stir in the seitan and cook 3-4 minutes. Add the cooked beans, along with 3 cups vegetable broth, and the chili blend. Simmer for 15 minutes. Adjust salt, if necessary, and serve hot over brown rice.

*If you slice the jalapenos in half and take out the seeds and veins with a spoon, you can reduce the heat. Be sure to carefully wash your hands with soap and water you handle peppers.

It's also probably important to note that many traditional white chilis are topped with a mild white cheese, such as Monterrey Jack. I haven't found a vegan cheese I like well enough for this purpose--but perhaps you know of one? If you're feeding a lacto-vegetarian, you might top this with a mild, grated white cheese--or at least put the cheese in a bowl on the table.