Pages

Showing posts with label fruit. Show all posts

Thursday, December 20, 2012

Cranberry Orange Scones

Cranberry Orange Scones (Vegan, GF)
It's been a long time since I made scones -- almost 18 months! That's far too long, and it makes me a bit sad (okay, so really only a year since I made any type of scone). This basic recipe is one of my favorites, and now I've modified it to be vegan in addition to making it gluten-free.

When I first posted the basis for this recipe,I hadn't been eating GF for very long. I used Bob's Red Mill flour, and was incredibly excited when the recipe turned out edible. Now, I'm more confident in baking GF and I experimented with the flours some. Generally, if you're creating your own GF blend a 70:30 (flours to starches) ratio works pretty well. This recipe hits that pretty close, though it's a bit higher on starches, which causes the scones to be reminiscent of sweet English tea biscuits.

If you're already baking GF, there's a good chance you have these flours in your pantry. If not, you can find them online (like anything else) or in most grocery stores, on the baking aisle. Xantham gum might be the tricky thing to find (and I actually don't love using it -- you're welcome to try the recipe without it. It works, but is a bit more crumbly.) and this too is pretty readily available now.

Scones remind me of breakfast with friends in the Midwest. The last time I made these, I created a glaze for the top using citrus juice and powdered sugar. I don't have powdered sugar on hand and it didn't seem worth buying for just this recipe, but if you want a slightly sweeter scone, I recommend it.

Cranberry Orange Scones
1/2 cup sweet white rice flour
1/2 cup sweet white sorghum flour
1/2 cup tapioca starch
3 tablespoons light brown sugar
2 1/2 teaspoons baking powder
2 teaspoons orange zest
1/4 teaspoon baking soda
1/4 teaspoon xantham gum
1/4 teaspoon salt

6 tablespoons butter, softened
1/3 cup soy milk combined with 1/2 teaspoon lemon juice to produce "soy buttermilk"
1 tablespoon flax seed mixed with 2 tablespoons warm water

Optional Quick Cranberry Sauce (you can use sauce leftover from another project or meal too!)
6 ounces fresh cranberries
1 tablespoon orange juice concentrate
1 tablespoon agave nectar

Place rack in the upper third of the oven and preheat to 425 degrees F. 
 If you don't have leftover cranberry sauce, combine all ingredients from the Optional Quick Cranberry Sauce in a small saucepan over medium heat. Allow to cook, stirring frequently, for 10-15 minutes while you prepare the scones.
Unbaked
In a mixing bowl, sift together flousr, xantham gum, sugar, orange zest, baking powder, baking soda and salt. Cut in butter until mixture resembles coarse meal. In another bowl, combine  soy buttermilk and flax seed mixture, then  beat lightly with a fork. Add to flour mixture all at once, stirring enough to make a soft dough. 
Turn out onto a lightly floured board (I used a little bit of sweet rice flour) and knead a few times to make sure the dough isn't too sticky -- it should hold together without sticking to your hands, but it shouldn't crack around the edges either. Roll or pat out into a 1/2-inch thickness. Cut into 8 large or 12 small squares. On half the squares, spread a thin amount of cranberry sauce(amount will depend on the size square you’re using and how much jam you want. I make small squares and use about 1 tablespoon sauce per finished scone). Place the remaining, squares on top to make a “sandwich.” Place scones on prepared baking sheet. and bake at 425 degrees F for 12-15 minutes, until they just begin to turn golden. 
Up Close, Golden Brown and Ready to Eat!

Friday, November 16, 2012

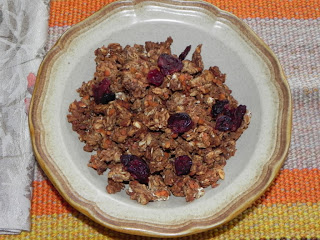
Orange-Lentil Granola

Orange-Lentil Granola
Regular readers, you might have noticed I was absent for a while. A fairly long while, compared to this spring. I was in the middle of another move, and now that I'm settled I hope (plan) to start posting more regularly again. I appreciate your patience and the handful of kind notes I got asking where I'd been.

Shortly after moving to my new place, I discovered a lack of (affordable) stick-with-you / nutrient-dense gluten-free cereals. I'd been spoiled by having a CSA share (sauteed veggies for breakfast most days) and access to cheap(er) cereals over the past year. To compensate, since I'm trying to survive on a really small budget, I started making granola again, and now make it a couple times a week. That much granola can be, well, a little boring.

That's what inspired this vegan, gluten-free granola, which has just a slight hint of orange. I don't like my granola particularly sweet, but if you do, add a little more brown sugar or a hit of agave to it. You might also experiment with the amount of orange you add. I use pure orange oil, so a 1/4 teaspoon works well. One of my testers though, used an orange extract and suggested that 1/2 teaspoon would be more appropriate. It's absolutely fine to taste it before you stick it in the oven, and add more orange flavoring, if you like.

The lentils in this granola add a lovely splash of color and a hint of protein. Soaking the lentils, as I suggest in the recipe (or boiling them for about 5 minutes, and then draining them) is essential. You'll (probably) get really gassy otherwise and they'll definitely crunch a lot when you bite into them. Be sure you use split red lentils.

This would be perfect to make a few days in advance of Thanksgiving, so you don't have to think about it on Black Friday morning, when everyone is feeling possibly-still-a-little-gross from the day before -- or something that you can make a lot of and put in mason jars as gifts for the winter holidays!

If you do decide to make this recipe in larger quantities, I find about 3 cups of oats per baking sheet works pretty well.

Orange-Lentil Granola
1/3 cup red lentils3 cups old-fashioned oats
1/2 cup packed brown sugar
1 tablespoon cinnamon
1/4 teaspoon salt

1 cup hot water (near boiling)

2 tablespoons canola oil
1/4 teaspoon pure orange oil

Mix all the dry ingredients ingredients together. Add the hot water and the oils, and mix thoroughly. Allow to rest 30 minutes to an hour (this will start to soften the lentils). Spread the granola mixture on a baking sheet and bake in a 300 degree oven for 45-60 minutes, stirring every 15 minutes, until the oats have turned golden and most are crispy.* Store in an airtight container.

*If some aren't crispy, they'll continue to harden as they dry. As long as the majority of your oats have begun to crisp, and you don't have any huge lumps of granola-cluster, you should be fine.
Orange-Lentil Granola, with dried cranberries

The pictures in this post are courtesy of Nick Clift.

Tuesday, November 13, 2012

Autumn Muffins (GF and Vegan)

Dog, seen on bike ride
Until recently, I worked at an Inn, where I made breakfast for people a lot. I love this work, because as you're probably aware (if you're a regular reader), I enjoy feeding people and forming a connection with others and with the environment via the things we put in our bodies. For me, cooking for others -- and eating with others -- creates a sense of community that I think is often overlooked in the way we usually run our lives. Unfortunately, a lot of the time at the inn, I made one of a dozen or so dishes and it quickly becomes pretty routine. I didn't always get to talk to our guests after they've finished their meal (there are so many things to do at an inn!), and I only had the opportunity to try one new recipe on guests (and this isn't it).

Happily, however, one of my co-workers (we'll call her J) and I started eating brunch together after work about once a week -- it was a wonderful opportunity for us to just relax, to talk about life, and generally hang out. We worked together in the kitchen, lovely change from the Sunday evening cooking I do for a handful of friends, and reminiscent of the Friday breakfasts I shared with friends when I lived in the Midwest.

Tree, no pretty leaves yet...
These breakfasts also presented an opportunity for me to actually feel inspired to try new things, or to make modifications to recipes I didn't like as much the first time around but see potential in. That's what happened with these muffins, which were inspired by a non-vegan recipe from my food co-op. These muffins are moist and taste like autumn -- perfect as the weather starts too cool off. Lately, I've even seen a few trees with red and yellow leaves!

We had these vegan, gluten-free muffins with a lovely veggie saute, made entirely with veggies from J's garden. They rise well, are moist, and hold together nicely (especially for a gluten-free product). If you decided to make these in loaf pans, you could definitely do that and because it holds together well, you could probably turn it into french toast (easier if you're not vegan). Afterward, we went for a bike ride together, and these muffins combined with the veggies, gave us plenty of energy for a 20 mile trip.

Don't let the ingredient list intimidate you. If you're already gluten-free, you probably have many of these ingredients around -- and if you're not, but are cooking for someone who is, these ingredients are available at most grocery stores. If you like nuts (I don't in baked goods), consider sprinkling a few chopped walnuts on the top of the muffins before throwing them in the oven.

Autumn Muffins (Gluten-Free)
2 tablespoons ground flaxseed
1 medium, overripe banana, well mashed
1/4 cup agave nectar
1/2 cup water
15 ounces roasted butternut squashed (mashed)
1 cup brown rice flour
1/2 cup quinoa or millet flour
2 teaspoons guar gum
1/2 teaspoon baking soda
3 teaspoons baking powder
1/2 teaspoon salt
1 teaspoon cinnamon
1/4 teaspoon ground clove
1/4 teaspoon grated nutmeg
1/2 cup shredded, unsweetened coconut
1/2 cup chopped dates, raisins, or dried cranberries

Preheat oven to 350 degrees F. Oil muffin tins*, or line with paper liners. Beat flax seed, banana, oil, agave, and water until creamy. Fold in butternut squash.

In a separate bowl, sift together all dry ingredients (brown rice flour through nutmeg). Fold the wet and dry ingredients together. Fold in coconut and dried fruit. The batter should be pretty thick, but add more water if it's the consistency of extra-firm cookie dough. Divide batter into muffin cups (3/4 full). Bake 25-30 minutes, until tops begin to brown and spring back lightly when touched. Allow to cool for five minutes before removing from the pan.

Serve warm. Store in an airtight container, and refrigerate after the first day. Keeps 2-3 weeks in the freezer.

*I come out with 12 regular sized muffins, plus 1 mini-loaf (which cooks another 10-15 minutes.
The Muffins!

Wednesday, June 20, 2012

Vanilla Cranberry Smoothie

I'll keep the prelude short, since I've been writing about smoothies a lot of recent. This smoothie continues to use my cranberry stash, and I added some rolled oats to help make it creamy. I added two leaves of Russian red kale from my CSA, because I could, and because I like adding in veggies whenever possible. In my mind, these additions, along with vanilla soy milk help the smoothie last longer -- and whether that's true or not, I felt less hungry a couple hours after finishing this smoothie, compared to some of my other recent concoctions.

Vanilla Cranberry Smoothie (with kale!!)
2 tablespoon OJ Concentrate
1 cup vanilla soy milk
1/4 cup GF old fashioned oats
1/2 cup cranberries
2 leaves Red Russian Kale

Combine all the ingredients in a blender and blend until very smooth. Add water or more soymilk if you like, to create the consistency you want (or that works for your blender). Serves 1.
Vanilla Cranberry Smoothie with Red Russian Kale

Monday, June 18, 2012

Eating Carrot Tops, plus (another) smoothie recipe

In my CSA box, I got carrots. I love carrots. But when you don't buy them in a pre-packaged bag, they come with greens which most people throw away. There's really no need for this. Any of you who read this moderately regularly will know how much I hate throwing things away (part of the reason I want a few chickens, eventually) if they could be composted or otherwise recycled. Since I don't have a compost heap, this means a lot of creative uses of the parts of veggies a lot of us throw away -- from bases to broths, to things like this lightly sweet recipe for...you guessed it! Another smoothie!

Carrot-top Smoothie
This is one of my favorite smoothies of late, in part because it has such a fresh flavor and because it's a brilliant, bright green. It's not particularly sweet, so if you like sweeter smoothies, add a tablespoon or so of agave, honey, or other sweetener of your choice. Personally, I think the apple juice adds enough sweetness, without adding much flavor -- unlike the vanilla soy milk, which also adds some sweetness, in addition to protein. The oats help thicken it.

Ready to try it? Yes? Carrot fronds (not the stem, that can be woody) work best for this recipe. If you're still wondering why eat carrot tops, here are just a few reasons:
  • a good source of potassium, chlorophyll, and vitamin K
  • brightens flavors in everything from salads to a garlicky pot of beans
  • Americans throw away a ridiculous amount of food waste
Carrot-Top Smoothie
1 cup carrot fronds, lightly packed
1/4 cup frozen apple juice concentrate
1/2 cup water
1/2 cup vanilla soy milk
1/4 cup oats

Add all ingredients to blender and puree until smooth. Add more liquid, to reach the desired consistency, if necessary. Serve.

Friday, June 15, 2012

Cranberry Raspberry-Lemonade Smoothie

As regular readers may have noticed, I've been on a bit of a smoothie kick (thanks, in no small part to my friend Marissa, over at We*Meat*Again, reminding me I liked them). I think it's the warm weather, all the other fresh goodies I've been eating, and the fact that I've been writing in the mornings rather than getting ready for work. Smoothies travel well and are fast to make. This is the next installment.

Yum, smoothie!
Don't ask why I have MinuteMaid Raspberry-Lemonade frozen concentrate in my freezer. It's a kinda long story -- but it's almost gone, because I've been making this smoothie a fair amount (okay, three times). It sweetens the smoothie nicely and allows me to imagine summer when I'm in the office. I like the sweet-tart flavor, the color is beautiful, and best of all, it doesn't use a banana!! It does use cranberries, so if you don't have those on hand (read about why I do), play around. The wonderful thing about smoothies is that they're pretty flexible.

When I take smoothies to work, I tend to also grab some carrots and/or nuts on my way out the door to make sure that I'm getting enough energy for the work day. Consider what your body needs and what will keep it happy, healthy, and functioning the way it should based on your work (or play!) environment.

Cranberry Raspberry-Lemonade Smoothie
2 tablespoons frozen raspberry-lemonade concentrate
1/2 -3/4 cup frozen cranberries (I like more, but they are too tart for some people)
1 cup milk or milk alternative of your choice (I use plain almond milk)
1 tablespoon vanilla protein powder

Combine all ingredients in a blender and puree until smooth. Serve.


Monday, May 28, 2012

Green Smoothie - Spinach-Mint

It's summertime (well, in just under a month) and I've been craving the fresh fruits and veggies that come with summer for quite a while now. Fortunately, my farmers market is already up and running and the local produce is coming in at the co-op and my favorite grocery store.

But beginning during the winter, when E and I were swimming several nights a week, I started making green smoothies. They were the perfect end to a workout, especially since we got home late and I didn't really want to eat dinner beforehand. The nice thing about green smoothies like the the one here is that some greens really start coming in over fall & winter -- and if you're on top of your game, you can get these greens fresh, cook them up and then freeze them in little smoothie-portioned chunks. If you're not on top of your game (and I wasn't this year, since I moved), you can also just buy frozen greens. Or, if you've got a better blender than mine, use fresh greens.

The mint extract in this smoothie helps tone down any bitter qualities of the greens, and the banana makes it smooth. Normally, as regular readers of my posts know, I'm not a fan of using bananas. Even when I buy them organic/fair-trade they're not the best environmental decision. Other options for making it smooth include: nut butters, yogurt, or (possibly) oats (my friend Marissa, over at We*Meat*Again just wrote about this possibility). 

If you have it on hand (which I do now--pineapple mint, if you're curious), you can also use fresh mint -- but it takes a lot more! The portions suggested below are just suggestions. If you think it needs to be sweeter (this may depend on the ripeness of your banana as well as your personal tastes), add some agave, honey, or other natural sweetener of your choice. Sometimes my smoothie comes out a little thick -- if this happens, just add a little water or more milk and that should solve the problem beautifully

Spinach-Mint Smoothie
1 cup almond milk (or other milk of your choice)
1/2 cup frozen spinach
1 large frozen banana, slightly thawed (again, unless you have a super-awesome blender -- which I don't)
4-5 drops mint extract or 1/4 cup fresh mint leaves, packed
1/4 cup chocolate chips (optional)

Add all ingredients to a blender, and blend until smooth. If you don't plan to drink it right away, store in a container that you can shake up later (in case of separation) and store in refrigerator.
Green Smoothie in a peanut butter jar

Wednesday, January 25, 2012

Quick & Convenient Cranberry Sauce

Making a couple nights ago for E and another friend, I wanted to include a bit of color -- and to make the meal feel a little fancier than rice & beans (posts on this later). I have a ton of cranberries in the freezer (and plan to buy more) and thought a cranberry sauce would be lovely to go with -- color, a bit of tart flavor to go with slightly spicy beans, and plenty of all those good things that come from cranberries. And when I paired it with a bit of guacamole from an avocado I've had for a while and which finally ripened, I thought the presentation was pretty lovely.

But the cranberries: I also had a bit of frozen raspberry-lemonade in the freezer, from when a transient friend stayed here for a few nights and didn't want to repack it (or forgot about it?) in his cooler. That's kinda like orange juice in the traditionally cranberry-orange flavors, but a bit more...fun. Or so I hoped.

Turns out, that's a pretty okay combo and this cooked up, over medium heat in about 15 minutes. It didn't cook so long that the cranberries collapsed completely, which was also nice. Plumpish cranberries in cranberry sauce are, well, nice.

Cranberry Sauce
1/2 pound fresh cranberries
1-2 tablespoons (to taste, I used about 1 1/2) frozen raspberry-lemonade concentrate
2 tablespoons water

Combine all ingredients in a small sauce pan over medium-high heat for 3-4 minutes and then reduce heat to medium, stirring frequently, until the cranberries are soft, but retain their shape (about 15 minutes). Serve hot or cool.

Note: You can also keep this over "warm" for a while if you want, but make sure to check it from time to time to see if you need to add more water, so that it doesn't scorch to the bottom. You could cook it down for a while to create jam or preserves, if you wanted, but you will want to make sure that if you go this route you stir it often enough that it doesn't burn as the water evaporates.

Sunday, January 22, 2012

Product Review: Salpica Mango Peach Salsa

I bought Salpica Mango Peach Salsa from my food co-op a couple of months ago with an immediate use for it -- only I wound up not needing it because what type of party needs three different (but similar salsa), especially when two are fresh? Not mine.

Anyway, I opened this salsa the other day, only to realize how runny it is. It's a bit like chunky, flavored tomato juice--which makes sense because filtered water is the second ingredient. The flavor is good (a little sweet, like it should be with fruit -- but did it also need sugar? Really? I don't think so) if you like slightly sweeter salsas, but that's not really my preference. I prefer the salsas that incorporate fruit without incorporating additional sugars. It's not particularly strong on onion or garlic flavors, for a salsa, or of the tangy bite of hot peppers, even though it's in the "Medium" hotness range. These are all things you should keep in mind if you're buying this salsa and have particular ideas about how bottled salsa should be.

However, I do appreciate that I can see evidence of roasting. And peaches and mangoes. And the occasional chunk of something like a pepper, tomato, or onion. But really, when I'm looking for salsa, I'm looking for something with more substance than this particular salsa, which I had trouble keeping on a chip--much less on veggies (which, is sometimes my preference -- like today, when I didn't really want corn chips).

The label claims "made in Texas" but my bottle, at least, is distributed from Illinois, which isn't so much of a surprise since this is where Rick Bayless (as an institution) is based and Salpica salsa comes through the Frontera supply chain. Either this is a horrible inefficiency or a marketing scheme. Anyone remember the "Made in New York City?? Get a Rope" commercial? There are a few versions out there, but when I was reading the label (more carefully at home so I could write this review than I did in the store) that's the commercial I immediately conjured.

It claims "no preservatives" and "all-natural," which are both technically true if you're talking about artificial preservatives, but most salsas contain preservatives -- citric acid in some form, usually -- especially ones that have been bottled. I'll take my citric acid and spare myself the case of botulism, thanks.


All in all, I might buy this salsa again. If it was on sale. And if the other salsas nearby didn't appeal, or if I was buying it with a specific salsa need -- I just can't think of what such a need might be.

Tuesday, December 27, 2011

Ambercup Squash with Forbidden Rice and Cranberries

When my local growers market was still running, I bought several varieties of squash I hadn't tried before, or had only tried once or twice. I've been slowly working through the pile and recently tried my ambercup squash. I hadn't tried this type before because in my grocery stores past, it was always just in a pile of winter squash with no flavor profile descriptors to be seen. Fortunately my growers market did a much better job with describing it -- though for the life of me, I can't remember what the sign near the bin of these squash said.

Forbidden Rice
I wanted to bake my squash and stuff it and so I looked at my ingredients and saw I had some forbidden rice (a black rice) I'd purchased from my co-op around the same time I bought the squashes. I decided to boil it up, adding split red lentils and some flavorings, and then stuff the rice mixture into the baked squash.

This recipe was nice, because of the small size of the ambercup squashes I used. I could cut them in half and stick two halves in my toaster oven (I could have also used my regular oven, but I didn't actually need to make all the filled squash right away), start the rice, and take the dog on a run -- and do all this after work. After 30 minutes, the squash was quite tender, the rice was ready for lentils and cranberries, and I only had a little bit longer to wait for dinner.

I made the conscious decision to make this recipe vegan, because I know at the beginning of the year, a lot of people make promises to themselves about the eating habits they will adopt in the coming year. My regular readers know I play with vegan recipes regularly, but if you're new to the blog this is a great recipe to start with -- it's savory, filling, and doesn't use (too many) bizarre ingredients. If you don't have access to forbidden rice, you could certainly use a short grain brown rice in a very similar way. Nutritional yeast, which provides a lovely cheese-y flavor without cheese, is available at most major grocery stores now -- but certainly in the bulk section of stores that focus on whole food approaches to eating and online. And this filling could go in a number of different winter squashes, be eaten on top of salad, or (in the summer, though you might have to sub out the cranberries unless you're like me and stock up on cranberries while you can or happen to live in a place that keeps them in the freezer section of the grocery store year-round) stuffed in a large tomato.

Without Sunflower Seeds
You can use fewer cranberries, but I really like cranberries and try to eat as many as I can while the season permits, hence the wide range. They'll definitely add a tart flavor to your dish if you use way too many, but I liked the lightly tart taste they provided for this meal.

After all the hyper-indulgent food from the past month, this dish is a welcome respite, and full of flavors that still match the season without being the flavors of the season.

Roasted Ambercup Squash with Forbidden Rice and Fresh Cranberries
2 small/medium ambercup squash, cut in half with seeds removed
2/3 cup forbidden rice
2 cups water
1/4 cup split red lentils
1/2-1 cup fresh (frozen) cranberries (to taste)
1/2 teaspoon red pepper flakes
1/4 teaspoon fines herbes
1/4 teaspoon salt
2-4 tablespoons nutritional yeast (to taste)
Shelled sunflower seeds, optional

Bake the squash, cut side down in a baking dish covered with a thin layer of water, for 30 minutes at 350 degrees then remove and allow to cool.

Meanwhile, combine rice and water in a small saucepan over high heat. When it boils, turn the heat to low and cover the pot. Cook 30 minutes.

After the rice has cooked for 30 minutes, increase the heat, remove the lid, and stir in the lentils, cranberries, and red pepper flakes. Cook 10 minutes and then stir in the fines herbes, salt, and nutritional yeast. Cook another 5-7 minutes to allow flavors to combine (add a small amount more water if the mixture begins to stick to the bottom of your pan -- you want it dry, but not so dry that it sticks).
Rice, lentils, cranberries, pepper flakes
Spoon the rice mixture into hollow part of the squashes and sprinkle the top with sunflower seeds, if desired.
(I like that they add a bit of extra crunch) Use salted and roasted, or raw, depending on your personal preference. Serve warm as a side dish, or a main meal.

Saturday, December 17, 2011

Apple Cinnamon Yogurt Scones

Frosted Evergreen
When I lived in the Midwest, the restaurant across the street from my apartment sold wonderful scones -- which (probably for the best) I didn't try until my last year living there, thanks to a friend I met during a 2 week long field trip for a Sustainable Agriculture class. This friend talked up these scones endlessly and after losing a bet with him (I don't even remember what we bet on!), I brought him a blueberry-lemon scone from this restaurant, which was the one he requested. Since I had to buy one for him anyway, I bought one for myself, just to try it. And then I was hooked.

The scones had none of the qualities I dislike about scones. They were moist, namely, rather than crumbly. They had flavor, personality. I wound up buying a scone a week for a while, until I decided to give up gluten. Giving up those scones was one of the hardest things about going gluten-free. In fact, I've replicated them in the non-vegan version before, in one of my posts about things to do with mulberries.

Warning to those of you who have found my blog by looking for vegan or gluten-free recipes. This recipe is neither. I made these scones because I planned to take a few scones to a dinner party and I wanted something that wasn't nearly as sweet as the "breakfast" (dessert) style scones I'd made. These are much closer to many traditional scones in their lightly-sweetness, but still aren't the type of scones that crumble (or shatter) as you take a bite out of them. I've got no interest in making those.

However, this is apple season and I've got a few apples that are softer than I generally like for eating. I'm a bit picky about how soft apples are "allowed" to be, which in my mind, is "not at all soft." Apples should be crisp. For this recipe, I'm using one Gold Rush and one apple that I've already forgotten the name of, both bought from my local growers market--from a farmer who grows more than 60 types of apples and has been generous enough to talk to me about the apples (and recommend books about apple varieties and cultivation) for the past three months.

These scones are different from the standard buttermilk scones in that I use yogurt instead--the same principle, but less liquid. To help balance this, I use both yogurt and whipping cream (you could use 1/2 cup of yogurt instead, potentially, but you might need to add some additional liquid) that I've curdled with lemon juice--this also lets me reduce the amount of butter I use.

If you're in the mod for apple cinnamon scones, here are a few other suggestions:

*Chocolate chips with orange zest (like the Joy the Baker recipe originally called for)
*Blueberry-lemon
*Cranberry white-chocolate (use a white chocolate glaze with fresh cranberries and lemon zest kneaded into the batter)

There are many more combinations of course, depending on what flavors you like.

Apple Cinnamon Scones
makes four large or six small scones

1 1/2 cups all-purpose flour 
2 tablespoons granulated sugar
2 tablespoons nutritional yeast
1 teaspoon thyme
2 1/4 teaspoon baking powder
1/4 teaspoon baking soda
1/2 teaspoon salt
4 tablespoons cold butter
1 egg yolk
1/4 cup low-fat or non-fat yogurt
1/4 cup whipping cream mixed with 2 teaspoons lemon juice or cider vinegar


Easy Apple Compote (see my post on this)

Place rack in the upper third of the oven and preheat to 425 degrees F. Line a baking sheet with parchment paper and set aside.

In a mixing bowl, sift together flour, sugar, nutritional yeast, thyme, baking powder, baking soda and salt. Cut in butter until mixture resembles coarse meal. In another bowl, egg yolk, egg yolk, and whipping cream. Add to flour mixture all at once, stirring enough to make a soft dough.

Turn out onto a lightly floured board and knead about 15 times. Roll or pat out into a 1/2-inch thickness. Cut into 8 large or 12 small squares (or more).

On half the squares, spread a thin amount of apple compote(amount will depend on the size square you’re using and how much jam you want. I make small squares and use about 1-2 tablespoons compote). Place the remaining, squares on top to make a “sandwich.” 

Place scones on prepared baking sheet and bake at 425 degrees F for 12-15 minutes.  

Let cool for 5-10 minutes, and then serve.

Half have a maple syrup glaze

Thursday, December 15, 2011

Easy Apple Cinnamon Compote

Easy and fast, I might add. This is a compote that I also use on my Apple Cinnamon yogurt scones (post on that to follow soon). Fortunately, this also saves pretty well for a couple of days.

Making an apple cinnamon compote was inspired by having a few soft-ish apples and by my friend Holly, who brought a lovely compote to a dinner E and I hosted not long ago. Holly's compote used raisins, lemon, cloves, cinnamon, and of course apples! Plus, what tasted like a fair amount of sugar. This compote is definitely a low-sugar compote, because I wanted something to go on the scones that wouldn't overwhelm people who didn't really want a super-sweet bite.

Compotes also go well on dark green veggies, over things like pork chops (if you eat meat), and on other savory dishes, adding a little complexity to each bite. Or you can be like me and just eat it straight, or as an ice cream topping. Whatever. You taste it and decide.

I made only a small batch of this compote because I only had a few apples I wanted to use up before they went  too soft even for this, but you could easily double or triple this. If you have fresh lemons you could zest for this, lemon zest would kick it up nicely. I didn't, so I don't include that in the recipe.

Easy Apple Cinnamon Compote
2 or 3 medium apples, peeled if desired (I never desire peeling), and chopped
1 tablespoon agave nectar or honey (remember agave is vegan, honey is not)
1 tablespoon lemon juice
1 teaspoon ground cinnamon
1/2 teaspoon ground cardamom
1/4 teaspoon ground cloves
Pinch of salt (don't leave this out!)

Mix all the ingredients together in a small saucepan and cook, stirring often, over medium heat until the apples have juiced and the sauce has thickened again, about 20 minutes. Cook longer, stirring frequently to prevent scorching, if a thicker/drier compote is desired. Store in an air tight container in the refrigerator up to 3 days, or serve immediately.


Thursday, November 24, 2011

Butternut Squash Soup with Three Types of Sweet Potato


Joyous thanksgiving. Let us use today as another reminder to focus on the things we are thankful for now (my friend Erica, over at Kinds of Honey is particularly good at finding small moments of beauty in the everyday and she reminds me, through her blog posts to be a more grateful and gracious person, something I am quite thankful for) and, at some future point, discuss the problems with celebrating Thanksgiving.

This dish was born out of a mini-dinner party, and a request for butternut squash stew. E wanted a chunky soup (more like a stew), with veggies--and I'm not one to stay no to veggies! When we went to the grocery store, we picked up sweet potatoes, three varieties, to add color, texture, and taste to the soup. We also decided to add carrots (because I always, always have carrots around). This is an easy, moderately low-fuss soup and could easily be made for Thanksgiving if you're prowling for a last minute idea!

At our grocery store, we actually had more than three types of sweet potato to choose from, plus yams. But we went with a white-fleshed, white-skinned sweet potato (O'Henry), a garnet sweet potato, and a Japanese sweet potato. For the soup, I cut these into moderately large bite-size chunks and scrubbed but didn't peel them, since all of the sweet potatoes were organic). If you can't find three types of sweet potato in your local markets, don't worry about it. Just buy three medium sized sweet potatoes and go with it. 
 
For the butternut squash: organic, canned butternut squash puree has been ridiculously inexpensive at my grocery store for several weeks now, so that's primarily what we used. But, I also had a butternut squash I wanted to roast up anyway, so we used about 1 pound of freshly oven-roasted butternut squash in the soup and I save the rest of the meat for another meal. I roasted the butternut squash while I cleaned, walked the dog, and was waiting for the bread to rise appropriately.

Pureeing about half the veggies you use lends to a thicker soup (you could also use less water, but with big chunky veggies, I think this looks weird and the flavor is pretty strongly "autumn" anyway). This is easier with an immersion blender, but could also work in a food processor or a regular blender. If you use one of these methods, please let the soup cool sufficiently so you don't scald yourself, or cause a lid to blow off from heat!

While I worked on the soup, E set a lovely table. She was excited about the opportunity to have a real dinner party, complete with a local wine, and a properly set table. And, truth be told, I felt excited about it too. She arranged my winter squashes and pie pumpkin around a piece of tableware from her family, and then we lit a lovely "holiday" scented candle.

The recipe I based this on actually uses shallot instead of onion, so if you've got easy access to that, I encourage you to use shallots . E and I didn't have shallots on hand and operate on a pretty limited grocery budget. If you wanted to make this vegan, you could use olive oil in place of butter, and coconut milk (perhaps 3/4 cup) in place of the whipping cream.

Butternut Squash Soup with Three Types of Sweet Potato
3 tablespoons unsalted butter
1/4 large onion, chopped fine

1 White sweet potato, with white skin (O'Henry), chopped
1 Garnet sweet potato, chopped
1 Japanese sweet potato (red skin with white flesh), chopped
3 medium carrots, sliced into coins
1 small apple (I used three large crab apples)

3 pounds butternut squash puree (see my notes above about this)

8 cups water
1 teaspoon salt

2 teaspoons dark brown sugar
1/2 teaspoon grated nutmeg
2 teaspoons lemon juice

½ cup heavy cream, scant

Melt the butter in a large soup pan, over medium heat. Add the onion and saute 1-2 minutes, until the onion begins to wilt. 
Stir in the chopped sweet potatoes and carrot coins. Cook 5-7 minutes, stirring infrequently, so the potatoes will begin to caramelize. Add the apple and cook another 3 minutes. 

Add the butternut squash puree and 4 cups of water. Bring to simmer and cook 5 minutes. Remove from the heat. Use an immersion blender to puree about 1/2 the chunky vegetables. Return to the heat and add remaining 4 cups of water. Bring to a simmer again. Stir in the salt, brown sugar, nutmeg, and lemon juice. Cook until all the vegetables are tender (to your liking; I like them with a little crunch the first day so they're not complete mush the second day).

Stir in the heavy cream. Adjust seasoning if necessary. Serve hot. 

Serves 4-6

Thursday, November 17, 2011

Not-Too-Sweet Chunky Apple Cake

Earlier this month, I was looking on a blog for work (yes, I sometimes get to read blogs for work, kinda awesome when i do) when I saw a post for a "kid-friendly" apple cake. The blogger was playing it up as super-healthy because it had DHA in it from flax. Okay, yes, technically you can get DHA from the ALA actually present in flax, but the human body isn't very good at making that conversion happen. And the original recipe contained 1 cup of sugar, plus 1/2 cup of butter. And that's before the topping, which also had a fair amount of butter and sugar.

Kid-friendly because it's super sweet? Fine. But maybe not the best option. The original recipe also used white whole wheat flour, which is fantastic (whole grains, whoo!), unless you're trying for a gluten-free diet.

I intentionally did not use guar gum or xantham gum in this recipe--quick breads don't always need it. That may be part of the reason that this cake is a little crumbly. It could also be that I used closer to 3 cups of chunked apples, or whole oats (which can be a problem for some people with gluten-sensitivity or intolerance, please ask if you don't know for sure). Or maybe I just didn't let it cool enough after initially coming out of the oven. It did get more solid as I let it cool.

The original recipe didn't contain any extra salt (maybe the blogger used salted butter, but the post didn't indicate one way or the other), so I added some because salt is a flavor enhancer. I also added cardamom and cloves because I enjoy the flavors. Also, it's just the time of year when I want the house to smell of sweet spices. As E put it when she came down in the morning, "It's that time of year, isn't it, when there's lots of baking?" I look forward to baking with her during these next few months, when the days are shorter and cooler.

I'd been wanting to make this recipe for a while, because it seemed like a fun thing to do with some of the extra going-soft apples I had around. I've already made applesauce this season (and will again) and still have some in my freezer. I wanted a different option. But I didn't really want a lot of bread. When my friend Rachael came for a visit, I decided it would be the perfect time to make this cake. I wanted to make it a lot less sweet and serve it with breakfast. I could send her on the road with some. And, because we planned to do a lot of hiking, it would be something fortifying we could eat in the morning and feel fuller with for a while.

The morning I made this, I also heated up some black beans Rachael brought with her, in a chipotle-peanut butter sauce and let them cook until the sauce thickened around them, which added extra protein to the meal--protein + whole grains = staying power. We spread a little extra butter on the bread, but a lot less than the recipe originally called for. Sometimes, I find spreading fresh butter on a bread lets me actually taste the butter, which I appreciate if I'm going to be eating those calories anyway. Then, we went hiking and walking through town and hiking again. And in between, we baked other things. Magical.

To make this vegan: substitute the egg for a flax seed egg, commercial egg replacer, or a banana, and use a vegan margarine or olive oil in place of butter. I used water in my recipe, but a milk alternative would work as well--and the original recipe used regular, low-fat milk.

Not-Too-Sweet Chunky Apple Cake (Gluten-Free)
Dry Ingredients
1 cup white rice flour
1/2 cup brown rice flour
1/2 cup old-fashioned oats (GF)
1 teaspoon yeast
2 teaspoons cinnamon
1 teaspoon baking powder
1/2 teaspoon ground cardamom
1/4 teaspoon ground cloves
1/2 teaspoon salt
1/2 teaspoon baking soda

Mix together in a large bowl and set aside while you mix the wet ingredients.

Wet Ingredients
1/2 cup sugar
3 tablespoons butter
1 teaspoon vanilla
1 tablespoon ground flax
1 1/2 cups water or low-fat milk
1 egg, beaten

Melt the butter and sugar together in a saucepan over low heat, stirring often. Add the vanilla, flax, and water or milk and remove from heat and let cool about 5 minutes. Stir in the egg. Add to the dry ingredients and stir until just combined.

Other
2 cups (or 3) chopped apples

Brown sugar
Cinnamon, optional

Stir the chopped apples and pour batter into a 9" greased pie pan or round cake pan. Sprinkle the top of the cake with brown sugar and cinnamon, if using. Bake in an oven preheat to 375 degrees for 25 minutes, or until a toothpick inserted into the center comes out clean. Let cool at least 15 minutes before slicing.

With butter


Thursday, October 27, 2011

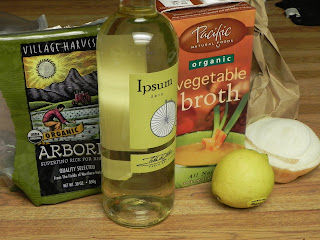
Lemon-y Snickett Risotto

Ingredients, minus dairy products
It's almost Halloween! What better to do than to have Halloween-themed food (which I fully intend to do for at least a couple of posts--hopefully that intention will actually happen!)? This post is inspired by E's recent endeavors into a (wonderful) lemon risotto. She's made it a couple of times now and it seems worthy of sharing with others. I'm not sure which site she got it from originally, either, but I am going to try and write it up to best reflect what she does when she makes it.

So, what makes this risotto lemon-y snickett risotto? Honestly, not much. Okay, not anything. Totally unauthorized re-use of the name (hence Lemon-y with a hyphen and snickett with two "t's") BUT, this basic lemon risotto can be dressed up with little "lumps of coal" (aka black olives), reptile tongues (aka carrot curls), or fire flecks (aka red pepper flakes).
Risotto in Pot
E seems to have endless patience for stirring the risotto rice--but honestly this doesn't take that long to make, as far as risottos go. In the past, I made a risotto that took forever to cook. And I don't remember it being as tasty as this one. The original recipe calls for parsley, but we haven't used it yet. I imagine it would brighten up the flavor nicely and provide lovely little flecks of green to make it look even fresher (serpent scales to go with the theme of lemon-y snickett?). We also haven't used shallots, but instead just use a bit of yellow onion. I suspect that the lightly garlicky flavor of shallots would be beautiful in this dish, so if you can get your hands on it, you should definitely use shallot in favor of the onion. Don't skip the lemon zest. It'll taste fine without it--but you get an extra hit of lemon flavor whenever you bite into a zesty curl.

Like many risottos, this dish is rich. But fabulous. And I would happily make/eat it for breakfast if I wanted something savory/lemony one morning and had all the ingredients handy. I might also saute some mushrooms and add that, but E doesn't like fungus, so we haven't tried that.

Lemon-y Risotto
4 cups vegetable broth
2 cups water
1 1/2 tablespoons butter
2 teaspoons olive oil
1/2 cup onion, chopped
2 cups arborio rice
1/4 cup dry white wine
ZestingTools & Zest
1 cup freshly grated Parmesan cheese (about 3 ounces)
3 tablespoons lemon juice (at least!)
4 teaspoons grated lemon zest

Bring broth and water to a simmer in a large bot over medium heat. Reduce heat to low; cover to keep warm. Meanwhile, saute onions in the olive oil and butter over medium-low heat, until tender, about 6 minutes. Reduce heat to low, add the arborio rice; stir one minute. Add wine and stir until evaporated. Add 1 1/2 cups broth; simmer until absorbed, stirring frequently.

Add remaining broth 1/2 cup at a time, simmering until completely absorbed before adding more broth. This will take about 35 minutes. Stir in cheese, then lemon juice. Add zest just before serving.
Risotto with "fire flecks"

Thursday, September 22, 2011

Agave-Sweetened Blackberry Jam

Blackberries are plentiful and everyone's out picking them. I see people people walking around with mason jars half-filled or filled with blackberries. I see people (like myself) wandering around with plastic bags and tubs gathering berries. And I see people (also like myself) picking just a couple and eating them.

You can tell a blackberry is ready to pick when it practically melts off its stem while you're pulling it off the bush. Usually at this point, blackberries have lost their sheen and are dark and perfectly black. My blackberries weren't all fully ready when I made this jam, as you can see from the picture, but I needed enough to make jam because I had enough that were crushing under the weight of their fellow berries and forming blackberry juice.

For the past couple of weeks, my fingers have been stained with blackberry juice, which has been lovely--and has made me even more excited for making blackberry jam (especially once my friend Rachael shared that she was making blackberry jam while listening to Iron & Wine one recent evening).

This is a simple blackberry jam, sweetened with agave nectar since some of my berries were under-ripe and tart.

Agave-Sweetened Blackberry Jam 
1/2 gallon fresh blackberries, well washed
2-3 tablespoons agave nectar
1 tablespoon lemon juice

In a medium pot, over medium-low heat, cook the blackberries until soft, then stir in the agave nectar and lemon juice.

Continue to simmer over medium-low heat, stirring occasionally until the jam has thickened to the desired consistency.


This will keep in the refrigerator, in a closed container, for about 2 weeks, or you can freeze it.

Monday, September 19, 2011

Snake Melon & Heirloom Tomato Salad

A friend recently gifted me a snake melon aka an Armenian cucumber. I looked at it, long and thin with pale green, ribbed skin, and said thanks and then wondered "what the hell do I do with this??" But, I like cucumber, which is what this (botanically speaking) melon tastes like and so I was pretty sure I could come up with something. I stuck it in my fridge and forgot about it for approximately a week.

Then I saw it again the other evening. It lay, accusingly it seemed, in my crisper (still crisp, by the way) and so I pulled it out. I'd picked up cheap, organic, heirloom cherry tomatoes from a local farmers market the day before and I resolved I'd put the cuke and the tomatoes together and come up with something to dress them up a bit.

Armenian Cuke aka Snake Melon
Armenian cucumbers, as I said before, are actually melons--muskmelons, to be exact, which puts them as a close relative to what Americans call cantaloupe. The Armenian cucumber is reputed to get a good slicing cuke (whatever that means--I don't think I've had an experience I would call "bad" slicing cucumber) and came from Armenia to Italy in the 15th century, at least according to one of the website I found online while researching this post. It's gaining popularity as an heirloom crop and supposedly grows well both on the ground and from trellises. All of this is wonderful, but there are almost no recipes for it online.

Here, I must admit I like Greek food. A lot. And although I only live a few blocks from a Greek restaurant, I don't think eating-out Greek food is in my near future. So, I poked through my spices and dried herbs, and as I already knew, I didn't have dill weed. Okay, new plan. Kinda. I wasn't ready to give up on my plans for Greeking-up my Armenian cucumber.

So, I chopped the Armenian cucumber and halved the tomatoes, then topped them with a locally-made European style yogurt, then gave it just a sprinkle of onion powder and black pepper. Greek? No. Delicious. I think so. I'm going to see if my friend has more of these cucumbers she'd be willing to part with -- something tells me, the way cucumbers grow (all ready all at the same time) she probably does.

Snake Melon (Armenian Cucumber) & Heirloom Tomato Salad
1 snake melon, approximately 24" long, quartered & chopped
15-20 heirloom cherry tomatoes, halved
1/4 cup plain European-style yogurt (this is a thin, runny yogurt), or to taste
Onion powder
Ground black pepper

Put the chopped snake melon and cherries in a bowl, then drizzle the yogurt on top. Sprinkle a dash of onion powder and a dash of black pepper, then toss gently and serve.

Serves 1-2.


Tuesday, August 16, 2011

Maine Blueberry Crunch Cake

A few years ago, I was visiting family in Maine and had the opportunity to go to a church-sponsored lobster roll feast. Here are a few things you should know:

1) I love Maine. As much as I'm ready to give up (Midwestern) winters, you could probably offer me a job in Maine (coast Maine, just so we're clear, because that's the only part of the state I'm familiar with) and I'd take it in a heartbeat--even if that meant winter galore.

2) I love my family's house in Maine. My cousins own the place and it's a gorgeous old white home on the Sheepscot River. And I love their old sailboat. And kayaking with them. I wish I saw them more.

3) I love Maine blueberries and spent a lot of time harvesting them on the trip I'm writing about, along with tart cherries from their cherry tree. Maine blueberries, lowbush blueberries, are tiny little blue pearls that grow in blueberry barrens. A side note: My friend John is from a town in Michigan which hosts a blueberry festival (they grow a ton of blueberries there) and whenever I hear this mentioned, I am skeptical that his blueberries are as good as the ones I picked in Maine.

4) I do not love lobster.

But enough of listing (5 - I really like lists). So, this church-sponsored lobster-roll feast was down the street from my cousins and I went to it on my way out of town on my last day. For some small fee ($5 comes to mind, but this was in 2008 so I might be wrong) I could get a lobster roll or (_______ something else, but don't remember what -- something also "Maine-ish"), a drink and chips, and a large chunk of blueberry cake. Blueberry cake seems to be served with most meals in Maine -- certainly this is pretty typical of what the lobster shacks offer with their combo meals.

After I ate, I asked about the cookbook they had for sale. Were the things I'd just eaten found in the cookbook? The people selling the cookbook--and other miscellaneous items, typical of what you'd find at any church basement sale, assured me this was the case. I bought the cookbook.

6) I also love church cookbooks that are highly regional. There are a couple of great recipes and a bunch of horrible ones that make me laugh.

I tried several of the blueberry cake/bread recipes to no avail and gave up on it when none of those recipes worked. The cookbook moved to the Midwest with me and I didn't touch it for three years. But the other night, my mozzarella-buddy and I decided to try and make one of these recipes again. Two weekends ago, she went blueberry picking at a local berry patch and wound up with gallons of (now frozen) blueberries.

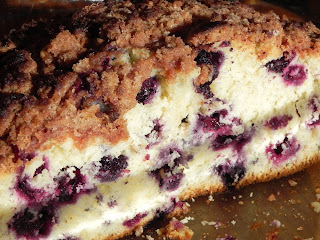
Although I'm making a point of avoiding gluten, I did try a small bite of this to see if it was the recipe and I believe it is. This is the original recipe (with a few corrections, since, for instance, the version in the cookbook doesn't tell you when to add the egg) and in a couple of weeks I hope to post a gluten-free version. The recipe comes from the 175th Anniversary of the Southport Methodist Church cookbook, and was contributed by Joyce Duncan. The batter is ridiculously thick. Don't worry about it. It all works out in the end.

Maine Blueberry Crunch Cake
1 1/4 cup sugar
2 1/3 cup all-purpose flour
1/4 cup butter
1 teaspoon cinnamon
1/4 cup shortening
1 egg
1 teaspoon baking powder
1/2 teaspoon salt
1/2 cup milk
2 cups blueberries

For the topping: mix together 1/2 cup sugar, 1/3 cup flour, butter, and cinnamon. Set aside.

Sift together remaining flour, baking powder, and salt. Mix remaining shortening until light. Add the egg and beat until incorporated. With mixer on low (or by hand, if you're me), add flour mixture alternately with milk until just blended. Stir in blueberries. Pour into greased 7 x 11 pan. Sprinkle on topping and bake at 375 degrees for 35 minutes. Allow to cool 10 minutes before serving.
Despite the thick batter, look at that crumb!